
ACCORDION REPAIR MADE SIMPLE 1
© 2014 George Bachich All rights recerved.Use these links to jump to the accordion repair articles on this page.
ACCORDION REPAIR IS NOT ROCKET SCIENCE
MAKING A BELLOWS PIN PLIERS
OPENING THE ACCORDION
WHY REPLACE OLD LEATHERS?
MAKING A TEST BELLOWS
NEVER OIL YOUR ACCORDION
REED VALVES - PLASTIC OR LEATHER?
POLISHING YOUR ACCORDION
PROPER SHOULDER STRAP LENGTHS
DOES YOUR ACCORDION NEED TO BE RE-WAXED?
WHEN IS IT TIME FOR A NEW BELLOWS?
WHEN IS IT TIME TO RE-VALVE THE TREBLE SIDE?
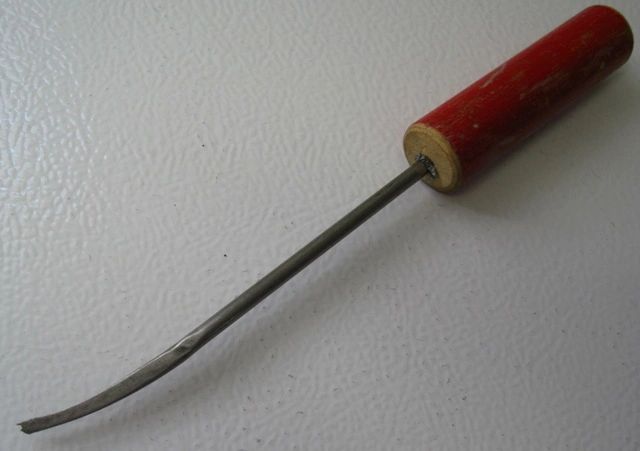
MAKING TREBLE KEYBOARD BENDING TOOLS
FREEING STICKING KEYS
TROUBLE-SHOOTING SILENT REEDS
VOICING REEDS
PIANO ACCORDION TROUBLE-SHOOTING GUIDE
CHANGING REED LEATHERS
FINDING AIR LEAKS
THE SUPERSTAR ACCORDION LEAK DETECTOR
REPAIRING STRIPPED-OUT WOOD SCREWS
REPLACING A BELLOWS GASKET
REPAIRING CRACKED OR BROKEN WOOD
INSTALLING A BACK PAD
Questions? Comments? Contact me via email.
In fact, accordions are very low tech. You don’t need fancy tools or expensive electronic instruments to fix your accordion. A sophisticated super-accurate electronic tuner, once a $300 to $500 item, can now be had for just a few dollars at the iPad/iPhone App Store, assuming you already have an iPad or iPhone (download "n-Track Tuner Pro").
But you don't even need that for most repairs. Nearly everything you will need to do can be done with standard tools you can get at the hardware store and a few special tools you can easily make from steel or aluminum rods or in some cases, from hardwood. If you have a hack saw, a bench vise, a bench grinder, a small drill press, a belt sander, and a couple of files, you can make all the special tools you need. The articles posted here on how to make specific types of repairs also include instructions on how to make the required tools.
The most important things you need to repair your accordion are motivation, mechanical aptitude, some hand tools, a work table, a little coaching from someone with experience (like me), and good sources for the correct repair materials. Mechanical aptitude is really nothing more than the desire to fix things, the ability to remember or record how they came apart, common sense, and perseverance.
The hand tools you need for simple repairs are pretty basic. To get any accordion apart and the reed blocks out, all you need are a screw driver and a pair of pliers (the best kind is a bellows pin pliers that you can make yourself from an inexpensive end-cutter pliers - see the short article below). For the most common repair, changing reed leathers, you will find a normally closed tweezers (the kind you have to squeeze to open) indispensable. You will also need a razor to cut reed leathers to the proper length.
Your work table should be big enough to allow you to spread out the three major components of the accordion (treble cabinet, bass cabinet, and bellows) and still have room to work on a reed block or two. Good lighting is essential, and an LED headlight (that straps onto your forehead) is essential for looking into tight places. Your work table should also include a tuning bellows, which you can easily make from an old accordion bellows. See the article on making a test bellows.
To return to the table of contents, click here.
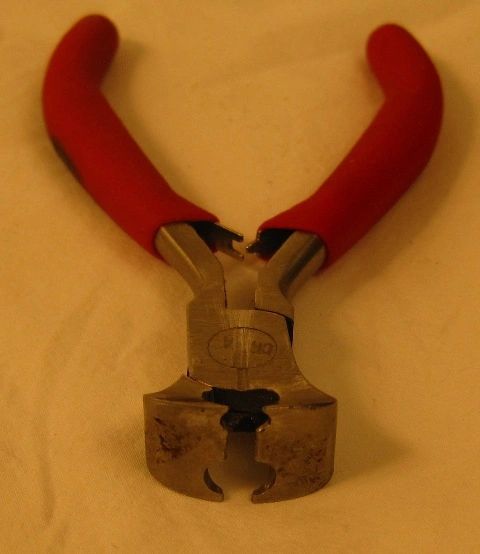
Modify a pair of cheap end-cutters (pliers with the cutting jaws across the end, rather than along one side) by filing two round holes centered where the two cutting jaws meet. The pliers can be cheap imports because you are ruining the cutting edges anyway. Make one hole about 3/16" in diameter for large bass pins, and make one 3/32" in diameter for small pins. I used round files of each size chucked into my drill press, and squeezed the pliers onto the spinning file until I had the hole I wanted. Here is a photo of the pliers I made.
To return to the table of contents, click here.
It is best to remove the shoulder straps and the back pad (if any) before opening the accordion. Once that is done, locate and count the bellows pins on the treble side of the bellows. There will usually be three or four on the back and three or four on the front, but there may also be one on the top and one on the bottom. Avoid marring the pins or the plastic finish on the accordion when you pull the pins. If you don't have the special pliers made for this purpose, you can wrap the jaws of any pliers with tape to pad them.
Stand the accordion on its feet, that is, with the bass plate and bass strap down. Grip each treble side bellows pin with the pliers and pull it straight out, steadying the accordion with your other hand as you do so. Some accordions have screws in place of the pins, in which case you will spin them out with a screwdriver. Keep the screws and/or pins in order, as they are often not all exactly the same length or diameter, and they should be put back into the same holes they came from. (To keep them in order, I stab them into a styrofoam block in the same order in which they are to be reinstalled, front pins in the front of the block, rear pins in the rear.)
When you have removed all the pins from the treble side of the bellows, try lifting one corner of the treble section off the bellows. You may have to hold the bellows down while you pull up on the treble section. If you meet significant resistance, check for any bellows strap or snap mounting screws within a half inch of the bellows that might be penetrating the bellows frame and remove them also. Forcing the accordion apart while any screw or pin still penetrates the bellows frame can damage the bellows frame, necessitating a costly repair.
In lieu of bellows pins, some aluminum bodied Hohner accordions have two lever latches under the treble grille that release the treble side from the bellows. On those models, remove the grille, rotate the levers 180 degrees, and lift the front of the treble cabinet off the bellows, then disengage the hinge clips at the back. Do not remove the screws along the back. To separate the bellows from the bass side of these accordions, first remove the bass cover, then release the two thumb clips and remove the bass machine and bass button board as an assembly, and finally, remove the five screws that fasten the bass cabinet to the bellows. The bass cabinet can the be lifted free of the bellows.
When the treble section first separates from the bellows, peek inside to see if any internal microphone wires must be disconnected before lifting it far enough to tear those wires loose from their mounting, which is often very fragile. Once the wires are unplugged, turn the treble section over and set it on the table with the reed blocks facing upward. Now you can inspect for bad leathers, cracked wax, missing reeds, loose reed blocks, etc.
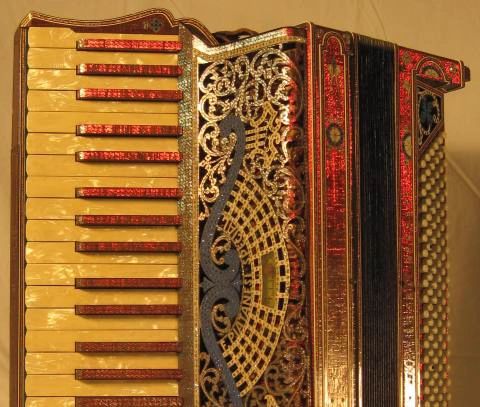
If your accordion has no tone chamber, the treble side will look something like this:

If it has a tone chamber, it will look like this:

The bass side, with the bellows attached, looks like this:

For better access to the bass reed blocks, remove the bellows from the bass section as well, but not before noting how it goes back together. If there are four bellows pins on the front of the bass section and three on the back, then it will be obvious which way the bellows goes back on. If it is not obvious, then mark the bellows frame with a pencil so you can be sure to put it back in the correct orientation, or the bellows frame will not seal and your bellows pins will not line up. Be sure to unplug any microphone wires before lifting the bellows too far.
If you are removing reed blocks, be very careful not to bend the register slides. In many older accordions, the slides are mounted in the reed block rather than in the foundation plate. If this is the case, lifting the reed block without first disengaging the slide from the switch mechanism can cause the slide to kink, rendering it useless. Once bent, they are very difficult or impossible to straighten well enough to work properly.
Note the orientation of the reed blocks and the details of the slide’s connection to the linkage so you will be able to put it back exactly the way it came out. When reinstalling any reed block, make sure it is securely and rigidly fastened down so no air can leak under it.
When you have finished your interior inspection, set the bellows back onto the bass section (being careful not to snag any bass reed leathers in the process), reconnecting any microphone wires as you go, and install the bass side bellows pins. Then set the treble section in place on the bellows, reconnecting any microphone wires as you go and making sure you have the bass buttons and treble keys all facing forward.
Install the bellows pins in their proper holes. If the pins are hard to push in, you can save wear and tear on your fingers by pushing them in with a small block of wood. However, if you have to push very hard, you may have the wrong pin in the wrong hole, or something misaligned. Make sure you have the best fit for all pins before forcing any pin into any hole. Finally, reinstall any bellows strap screws you may have removed, and put on the shoulder straps and back pad.
Access to the bass machine is easiest while the treble side is removed from the bellows, because this allows you to set the bass half of the accordion down on its bellows with the bass cover facing up. If you don’t take the treble side off, it is hard to stabilize the accordion in this position unless you use an accordion stand, a simple frame that keeps the accordion from tipping over or sliding away while you remove the bass cover. You can make it out of scrap lumber and a few drywall screws. I used 1 x 1 boards I ripped from some recycled 1 x 4, but you can make yours from just about anything. You might want to pad it with felt, foam rubber, or carpet to help protect the finish on your accordion.


Usually, you remove the bass strap by backing off the large knurled nut until that end of the strap comes loose. Many really old accordions have the strap screwed directly to the bass cabinet, in which case you simply remove the screws. Others have a pair of machine screws mounted in the bass cabinet (threaded ends facing upward) that engage holes in the bass strap. In this case, a rectangular washer and small knurled nuts on those machine screws clamp the strap in place, so just remove the nuts and washer. It is usually not necessary to disconnect the other end of the bass strap. Just pull the strap out of your way to get access to the bass cover fasteners. The bass cover is usually held on by four screws near the corners, but sometimes just two screws, top and bottom, and sometimes with some sort of spring clips or sliding pins or push-button releases, and no screws at all. Watch out for very tiny countersunk wood screws along the edges of the bass cover, especially near the center of the front edge. If there are any, you definitely want to remove them before pulling the bass cover off. Once you have the cover off, you can see the bass machine. When you put the bass cover back on, be sure to guide the air release button through its hole in the bass cover before you install any of the screws.
Here is a typical bass machine:

To return to the table of contents, click here.
WHY REPLACE OLD LEATHERS?
Proper accordion maintenance includes periodically checking the reed leathers and replacing any not in perfect shape. What is perfect shape, you say? Well, every leather should be soft and pliable and should return to position tight against the reed plate after each use.
Reed leathers are small leather check valves mounted on the reed plates. There are two on each reed plate - one on the side facing into the reed block and one on the side facing outward, that is, out into the bellows. Their function is to prevent bellows air from leaking through the reed vents (slots over which the reed tongues are mounted) not in use. Leathers should close under their own power whenever they are not forced open by air coming through the reed vent behind them.
When the bellows is expanding (bass section moving outward), the reed tongues on the inside of the reed block are in use, as air is drawn into the accordion through any open note valves. The leathers on the inside of the reed block adjacent to those reed tongues close off the adjacent reed vents to prevent air from leaking into the bellows through those vents and through the reed tongues behind them on the outside of the reed block.
When the bellows is being compressed (bass section traveling inward), the air flow is reversed, bringing the reed tongues on the outside face of the reed block into play. In this case the leathers on the outside of the reed block remain closed to prevent air from leaking out past the reed tongues on the inside of the reed block. Air rushing out of the accordion through any open note valves forces the interior leathers on those particular reeds to open, while the higher pressure within the compressing bellows forcefully closes the leathers on the outside of the reed block.
If leathers hang open too far, say 1/4 inch or more, they may not close at all, resulting in a significant air leak, and throwing the adjacent reed tongues out of tune. This can make you think your accordion needs tuning, but simply replacing the bad leathers will probably bring it back into tune.
If leathers hang open between 1/4 and 1/8 inch, they may eventually close, but only after their adjacent reeds have begun to sound. Those reeds will initially sound out of tune until their leathers close, at which time they will suddenly jump back into tune, resulting in an audible pitch change shortly after the reed begins to sound.
Leathers hanging just slightly open, say 1/8 inch or less, will be forced closed by air pressure before the adjacent reeds begin to sound, but not before some air has leaked through the vents they are supposed to seal. This leaking air momentarily relieves the pressure on the adjacent reed tongues, slightly delaying their response. Even though these marginally bad reed leathers may not sound bad, they will sap your accordion's performance, causing your reeds to respond more slowly and causing the accordion to use more air than necessary.
To get the best performance out of your accordion, you should keep all the leathers in perfect shape. Some people pay thousands of dollars extra for accordions with handmade reeds because handmade reeds respond just a bit more quickly at low bellows pressures, significantly improving accordion performance. You may be able to get a similar increase in performance for much less money simply by replacing all your bad leathers.
To return to the table of contents, click here.
HOW TO MAKE A TEST BELLOWS
You can make a simple test bellows from an old accordion bellows and two pieces of plank or plywood. If the bellows frame has already been cut off your old bellows, as would be the case if this bellows had been replaced by a new one, simply cut two pieces of 1/2 inch plywood to fit over each open end of the bellows and glue them on. Make sure your glue joints are air tight. To facilitate anchoring it to your work bench with screws, bolts, or clamps, make these wooden end caps slightly larger than the outside dimensions of the bellows. A one inch margin all around should be sufficient.
If your bellows still has its wooden bellows frame attached, as would be the case if the bellows had simply been salvaged from a junk accordion, you can use wood screws to attach your end plates to the bellows frames, then seal the joints with hot reed wax. Alternatively, you can put foam weatherstripping or gasket material between the bellows frame and the end plate before screwing it together. This latter solution makes the most sense if you are going to put weights inside.
If you prefer not to anchor the bottom end plate to your work table, you can add enough weight inside to hold it down while you are lifting the top plate to expand the bellows. A couple of bricks or a big box of bolts or a bag of sand placed inside the bellows should do the trick.
Make a hole near the center of the top plate approximately the same size as the holes in the bottoms of each chamber in a reed block, about 1/2 inch in diameter. A hole this size will minimize the need to silence adjacent reeds in order to hear just the one you want to test, and is best if you will be using your test bellows just to check the operation of reeds and leathers.
However, if you will be tuning, it is essential that the hole in the bottom of the reed block be consistently placed completely over the hole in the top of the test bellows. In that case, a larger, rectangular hole is best. The hole on my tuning bellows (not the one shown below) is 7/16" wide (parallel to the rail) x 3/4" long. The drawback to larger holes is that air sometimes feeds to multiple reeds, forcing you to silence all but the one you want to test.
Glue a piece of leather to the top plate, fuzzy side up, centered around this hole. You might also choose to fasten a small wooden rail or metal angle about 1/4 inch away from the hole to facilitate properly aligning the reed block over the hole. If you have made a larger rectangular hole, you can place the rail a bit closer, say 1/8" from the hole. If you scribe index marks on the rail aligned with the edges of the hole, it will be easy to see whether you have it centered.
To use the test bellows, place the reed block on the top plate with the hole on the bottom of the reed chamber of the reed you wish to sound aligned with the hole in the top plate. If the hole in the top plate is large enough to also sound the reed on the opposite side of the reed block, you can silence it with a piece of fabric or leather squeezed against it with the fingers of the hand holding the reed block in position. Your other hand will be used to raise and lower one end of the test bellows to force air over the selected reed.
When using your test bellows for tuning, be aware that the pressures are reversed relative to those inside the accordion. Compressing the test bellows generates higher pressure air to drive the reed tongue on the inside of the reed block, while on the accordion, the higher pressure air resulting from bellows compression drives the reed tongue on the outside of he reed block. Thus, on the test bellows the inner reed tongue works under higher pressure than the outer one, just the opposite of what occurs inside the accordion. Since the reed frequency is impacted by air density, which is proportional to the pressure, the frequency of both the interior and exterior reeds will be different on the test bellows than they are inside the accordion. Tuning the reeds to their proper frequencies on the test bellows will throw them out of tune in the accordion, where it really matters. The proper use of a test bellows during tuning is therefore limited to making corrections of the magnitude determined while the reed block is in the accordion. That is, if the reed plays three cents too flat in the accordion, you can use the test bellows to determine when you have sharpened it the required three cents. For instance, if on the test bellows the tuner indicates that same reed tongue is one cent too sharp, you can sharpen it until it indicates four cents too sharp, which should put it right on pitch once it is back in the accordion.
Your test bellows has many uses other than tuning. You can use it to voice reeds, to find loose reeds, to find silent reeds or to verify that you have successfully cleared them, to observe reed valve (leather) operation, and, in conjunction with your tuner (or your well trained ear) to sound possible replacement reeds to determine whether they produce the note you need.
Here are two photos of one I made recently. I used an old bellows cut from an accordion to allow installation of a new bellows, so the old bellows had no frames on it. I glued the bottom of the bellows directly to the bottom board, made a new bellows frame from 1 x 1 lumber, which I glued to the top of the bellows, and screwed the top board to that bellows frame with foam rubber weatherstriping sandwiched in between as an air seal. Because I did not want to screw it down to my work bench, I put a bunch of heavy bolts inside, glued in place to keep them from shifting around, These can also be made without interior weights and mounted under a table, actuated downward by foot pedals and returned upward by springs, but I prefer to have mine on top so I can operate it by hand in order to feel the pressure being applied and get a better sense of how the reed is responding to that pressure.


You can use your imagination to build a different design. One of the readers of this website, Chris Krasev of Milton, Ontario, submitted the following photo of an interesting one he built. As you can see, he added moveable rails and air valves made up from register slides salvaged from a junk accordion.

Dennis Amott of North Vancouver, Canada, sent me a link to his Youtube video of a tuning bellows he made. If you click the link, you will see that he made a portable table top model that opens downward, so the top plate remains stationary and level as the bellows is opened, allowing it to be operated with just one hand.
To return to the table of contents, click here
Accordions are big air filters. Lots of air is pumped through them, and the moisture, dust and lint in the air all tend to collect on interior parts, so the air emerges cleaner than it went in. This accumulation of lint in the accordion is inevitable, but oiling any part in the accordion tends to make it even worse. The oil attracts more dust and lint than before, and when enough of it combines with the oil, it makes a thick, gooey substance that can cause keys, bass buttons, and register switches and slides to stick.
When you encounter a sticking key, button, switch, or slide, you may be tempted to oil it, but on accordions you should resist that temptation. The better course is to take it apart, clean it thoroughly, determine the source of friction, sand, smooth, polish, realign, or loosen parts as necessary to reduce the friction, and put it back together dry. Although oil may seem to help in the short run, in the long run you will regret using it. If you absolutely must use some lubricant, try graphite, but very sparingly, or you will have another kind of mess as the graphite spreads to areas you never intended it to go.
To return to the table of contents, click here
REED VALVES - PLASTIC, OR LEATHER?
Some accordions are now made with plastic reed valves (ventilli) rather than the more traditional leather. Is this an improvement in accordion quality and performance, or just a cheaper way to build an accordion?
Plastic reed valves have some apparent advantages. They are lighter and more flexible, and therefore may open under less bellows pressure. If this were to allow the reed to respond more quickly, it would improve accordion performance. After all, rapid reed response is one of the highly desirable characteristics of reeds. But if the amount of air flow required to open the leather reed valve is already less than that required to sound the reed, then a valve that opens even earlier would offer no real advantage.
Previous observations lead me to predict that if the plastic ventilli do offer any advantage, it will be most apparent at the higher frequency reeds. These are the smallest reeds in the accordion, which require the least air flow to sound, and which do not normally have leathers because the air flow required to sound the reed is not sufficient to force a leather valve open. Installing a leather on these small reeds significantly delays their response or silences them entirely. It is here that the plastic ventilli, if it actually opens under less pressure, would be most helpful. But it is also here that leathers are least needed, because the leakage around these tiny reeds is already very limited by their size. I therefore suspect that although plastic ventilli probably do offer some performance advantage at the higher notes, and especially on handmade reeds which require even less air to operate, the advantage is likely to be small.
Plastic ventilli offer another apparent advantage. The plastic seems much less likely than leather to curl away from the reed plate, because plastic is lighter and less likely to sag, and because it is impermeable to moisture, which is reputed to be one of the major contributors to the curling of leather.
However, plastic cannot duplicate one of the reputed functions of leather, which is to help keep the reeds dry by absorbing moisture from the air. The importance of this function is a matter for debate, and the question is moot in cases where the accordion is not subjected to moisture. Nevertheless, leather reed valves might have an advantage on this point.
Plastic ventilli are available in more distinct lengths than leather reed valves, and thus offer time savings during installation by eliminating the need to field cut leathers to the proper length for each reed. They are also less expensive than leather, although leather reed valves cost only about ten cents each in large quantities, amounting to about $35 for a full set for a full size 41/120 4/5 accordion.
So which should we use? Until I or someone else experimentally confirms that plastic noticeably improves reed performance, I will continue replacing leather with leather and plastic with plastic unless I feel the leather might be adversely impacting the response of a particular reed, in which case I will substitute a plastic ventillo.
To return to the table of contents, click here
POLISHING YOUR ACCORDION
Accordion manufacturers polish the celluloid finish on their accordions using large floor mounted buffing wheels and a series of successively finer abrasive buffing compounds.They do this polishing prior to attachment of grilles, straps, metal trim, etc, and before the accordion is assembled. At the polishing stage, the treble and bass cabinets are devoid of keys, buttons, reed blocks, and bellows. The operator stands in front of the rotating cloth buffing wheel, applies buffing compound to the wheel, then presses the bare accordion cabinet into it, being careful not to generate enough heat to cloud the surface of the celluloid. When he has it uniformly shiny, he switches to a different buffing wheel where a liquid polish is used for the final finish.
Although few of us have large buffing wheels at our disposal, we should adopt this general approach whenever we polish our accordion, even if we polish by hand. That is, the accordion should be disassembled and the individual components polished separately. In this way we avoid leaving unsightly deposits of buffing compound under the edges of metal trim parts, at the junction of treble grille and treble cabinet, on the grille cloth at grille openings, and in between keys and buttons. This approach also allows us to polish what would otherwise be difficult to reach corners where cabinet and trim parts meet. Using buffing compound and a powered buffing wheel saves time and effort, but even fairly significant marring of the finish can be polished out by hand if you apply buffing compound in sequentially finer grades along with a lot of "elbow grease". For the final finish, use the micro-abrasive polishing compounds sold in auto parts stores specifically for restoring the clarity of plastic automobile head lamp lenses. Don't use so much that it flows over the surface or into little nooks and crannies where you can't get it all out.
In between these major polishings, we need only wipe off the finish with a soft cloth. If the finish is really grungy, the cloth can be dampened with rubbing alcohol, but no liquid should ever be poured or sprayed onto or into your accordion. Slathering wax all over your accordion, then buffing it out like you would your car just makes a mess, due to all the angles, joints, and other irregularities in the surface. Besides, mechanically polished celluloid is naturally shiny, and does not require wax. If the finish has dulled, wax will not improve it much anyway. The marring and scratches should be mechanically buffed out just as they originally were at the factory.
Special care should be taken with the keyboard. Keys can be cleaned in place using a soft cloth dampened with rubbing alcohol. But never allow any liquid to run down in between the keys. The keys and keyboard are usually made of unfinished wood. Moisture absorbed into the wood can cause local swelling and warping, which in turn can cause keys to stick. For particularly difficult key cleaning jobs, see the article on cleaning and buffing keys.
The real key to keeping your accordion shiny is not to let it get dirty in the first place. If you protect it from scratches and wipe it off with a soft dry cloth or chamois each time you play, it may never need to be polished.
To return to the table of contents, click here
Accordion shoulder straps come in mismatched pairs, that is, one strap is longer than the other. If you examine them closely, you will see that the upper portion of each is identical, and all the variation is in the tail, which connects to the bottom of the accordion. The strap on the right has the longer tail because the accordion must sit left of your center. Depending on your size and the location of the strap brackets on the accordion, the right shoulder strap might be 4 to 6 inches longer than the left when properly adjusted.
When adjusting your straps, you should begin with the left one and adjust it short enough to hold the accordion suspended from your left shoulder so that the centers of the black keys on the right side of the accordion are directly under your chin, and the top of the accordion is about four inches below your chin. Then adjust the right strap long enough to accommodate the accordion position achieved with the left strap alone.
Many accordions have straps too long to be adjusted in this manner. In that case, you might be able to punch more holes in either or both ends of the strap segments to allow them to be shortened by adjusting the buckles. But if this still will not allow the straps to be adjusted tightly enough, you will have no choice but to shorten them. In this case I generally switch the tails so the shorter tail goes with the right strap, so I only have to shorten one of them. In other words, the short tail becomes the long tail and the long tail gets shortened to become the new short tail, usually 4 to 6 inches shorter than the other.
Begin by drilling out or prying apart the rivets that hold the large buckle in place. Note the location and size of the slot for the tongue of the buckle and the location and spacing of the rivet holes, and duplicate that pattern farther down the strap at a location that will produce a tail of the desired length. If you wish, you can cut off the excess strap length and use it as a template to make the new holes. Use new two-part rivets to install the buckle in the new location, in the same manner as it was originally installed.
If you plan the tail lengths to fit when each tail's buckle tongue is in the middle hole of its upper strap, you will have ample room to make minor adjustments in either direction later.
To return to the table of contents, click here
DOES YOUR ACCORDION NEED TO BE RE-WAXED?
The hundreds of aluminum reed plates in your accordion are held to the wooden reed blocks by a mixture of beeswax, resin, and a small amount of linseed oil. Over time this mixture dries, hardens, and becomes brittle. Eventually, it will crack around the reed plates, allowing them to vibrate themselves loose. When your reeds start falling out, it is definitely time to re-wax.
However, you might decide to re-wax before reeds start falling out. For instance, if your accordion needs tuning, the reeds should be thoroughly cleaned before tuning begins. This is because the dirt on them is probably what causes them to be out of tune. If you tune a dirty reed, then clean it later, it will need to be tuned again. You can short-cut by using a tiny brass wire brush to clean the outside of each reed tongue, but it is practically impossible to clean the side facing into the reed block. The only way to thoroughly clean them is to take them out of the reed blocks first. This naturally requires waxing them back in after they are cleaned. If very many reeds need tuning, you might as well re-wax the whole thing.
There are other reasons to re-wax. The quality of the sound your accordion produces is partially dependent on the condition of the wax. This is because the reed itself produces only a feeble sound until it is anchored to a reed plate and until that reed plate is anchored into a reed block, which in turn is mounted to an accordion. The vibrations of the reed tongue are transmitted through the rivet to the reed plate, then through the wax to the reed block, then through the wooden reed block and on into the accordion cabinet. That's why you can feel the accordion vibrating against your chest as you play it. The accordion cabinet is a bit like the sound board in a piano, or the body of an acoustic guitar. The quality of the sound we hear depends on the efficiency with which those vibrations are transmitted through the various materials, including the wax, as well as on the quality and construction of the reeds and cabinet. Old brittle wax transmits sound differently. Fresh wax could make your accordion sound more like it did when it was new.
However, re-waxing is very time consuming and expensive. If you pay to have it done, the cost could exceed the market value of your accordion. In this case you might decide to forego the new wax and just spot tune the reeds needing it most. You might also decide to wax it yourself, in which case you might be interested in the article on waxing reeds to be posted soon on Accordion Repair 2 of this website.
To return to the table of contents, click here
If an accordion uses very little air, we often describe it as having a good, tight bellows. If it uses lots of air, we sometimes say it has a leaky bellows. But often the leaks are actually elsewhere, in which case replacing the bellows will not solve the problem. How can we know if our bellows should be replaced?
Some people replace their bellows just to get a different color. But a new bellows installed can cost $350 to $450. At these costs, you probably prefer not to replace your bellows unless it is truly necessary.
The first step is to determine exactly what is leaking. A good article on how to analyze and locate your air leaks is posted elsewhere on this page. Following the procedures outlined there should help you find and fix your leaks, and may save you the expense of a new bellows. If you find the bellows leaking, you may want to replace it, as bellows repair is time consuming and costly, and often leaves the bellows looking a bit rough. However, it still may be economical to repair your old bellows if you do it yourself.
If you have eliminated all other possible sources, and if you know your leak is an external leak as defined in the "finding leaks" article, you may conclude that your bellows probably has lots of small leaks, each too small to detect, that add up to a lot of lost air. In that case, replacing your bellows will probably breathe new life into your accordion and be well worth the cost.
You might also decide to replace your bellows if it has more than two or three loose metal corners. A few corners can be replaced fairly economically (especially if you don't mind leaving the bellows tape in a bit of a mess right at the corners), but replacing them all costs about as much as a new bellows, especially if the bellows is re-taped at the same time. If just a few corners have come loose because the glue has failed, it may make sense to repair it. But if the corners are loose because the metal has cracked, then many other corners are also likely to be cracked and will work loose shortly, in which case you will be better off with a new bellows.
You might also consider a new bellows if most of your bellows tape needs replacing, as the labor cost of re-taping an entire bellows could exceed half the cost of a new bellows. The advantages of having a new bellows might outweigh the savings realized from replacing just the tape. These advantages include a long trouble-free service life, a newer appearance, improved air tightness, improved stability, and the opportunity to pick a new color.
Improved stability is a factor worth mentioning. Sometimes, even when they don't leak, old bellows just get so loose and flexible that they tend to bulge out of alignment under compression, requiring you to follow them around a bit in order to push them closed. If your bellows starts acting more like a Slinky than a bellows, you might be happier with a new one.
You will find two bellows-related articles on the "Accordion Repair 2" page of this website - "Replacing Bellows Tape", and "Installing a New Bellows". In the future you will also find an article on general bellows repairs.
To return to the table of contents, click here
IS IT TIME TO REVALVE THE TREBLE SIDE?
If you find leaks at the treble valves, you might be able to adjust the pallets to stop the leak. Check first to see that the offending pallets are centered over their ports and that all four corners as well as the centers of each side of each pallet are in firm contact with the foundation plate, and adjust them as necessary for a good seal by bending the key rods.
To check for firm contact, cut a narrow strip of paper to use as a feeler gauge under the valve to be sure you have equal drag on all four corners and along each side. See the discussion on leveling the keyboard in the article titled “Setting Up a Treble Keyboard for Shallow Action” for some useful tips on how to bend the key rods without damaging the keys or pallets, and for instructions on how to make the tools you need. Also make sure no debris is lodged under the pallet that might prevent a good seal.
If you find all four corners snug, but poor contact along the middle of one or both sides, then you probably have a warped pallet, in which case you will have to remove the pallet, strip off the valve facing, sand the pallet flat, and install new valve facing.
If the pallet seems to have firm contact all around, yet still leaks, then remove the key, fluff up the nap of the leather valve facing with a tooth brush, and reinstall it (see the discussion on how to disassemble various kinds of keyboards in the article titled “Setting Up a Treble Keyboard for Shallow Action”).
If the leak persists after all this, it is probably because the surface of the valve is pillowed due to compression of the felt liner. It is normal for the nap of the leather to be flattened around the port, leaving a visual image of the ports in the leather facing, but if you can also feel a raised waffle pattern left by the ports, then it may be time to re-valve.
This pillowy waffle pattern is caused by compression of the felt under the leather valve facing due to age and normal wear. Whenever you see noticeable pillowing, you will be better off to re-valve, because the new valves will seal better and will also operate more quietly. If such a valve is off center and you try to center it, the waffle pattern will no longer fit exactly into the ports, and the valve will still leak. The only solution in this case is to replace the valve facing with new leather/felt laminate. If one valve is pillowed, all the others are probably also pillowed, in which case it is time to re-valve the treble side of the accordion. The bass valves normally have thinner felt pads which are much less prone to pillowing.
You might decide to re-valve even if no valves are leaking. If any of your treble keys are higher than the ends of the keyboard cabinet, this is usually evidence of valve felt compression. Place a long straightedge lengthwise down the keyboard, extending past the keys at both ends of the keyboard. When the accordion left the factory, all the keys were probably level with the ends of the keyboard. The extent to which you can depress keys with this straightedge is the extent to which compression of your treble valve facings has allowed the keys to rise.
Compressed felt is less effective as a cushion, resulting in more noise when the valve slams shut under the pressure of its return spring. The compressed felt also allows the key to return to a higher position, thus lengthening the key stroke and giving the spring more time to accelerate the valve, giving it more momentum to dissipate upon closing. Most of this momentum is dissipated as noise. Leveling the keyboard can eliminate this extra travel and the resulting extra momentum, but it does nothing to make the felt a more effective cushion. If you have a clunky noisy keyboard, re-valving is the best way to improve it.
See the article titled "Renewing Treble Valves" for tips on how to do it, where to get the felt and leather laminate, and other options for improving and quieting your keyboard action.
To return to the table of contents, click here
You sometimes need to raise or lower treble keys, either to correct one that has been bent upward by catching on a case or strap, or to compensate for different rates of deterioration and compression of the felt valve padding, or to compensate for a slightly different thickness of valve facing material used to re-valve, or to set up the keyboard for shallower action. Raising or lowering treble keys is accomplished by bending the key rods.
But let's start with how not to bend key rods, as some people are tempted to try shortcuts, which seldom work out as desired. For instance, do not hold the key down while you press down on the treble pallet, and do not simply pull up on a key to raise it. Either of these actions will compress the felt valve padding, perhaps producing the desired result temporarily, but only until the felt lofts again to near its original thickness over the next few hours. Using this "shortcut" could also loosen the treble pallet's connection to the key rod, which is often just a bed of wax. If your "shortcut" over-stresses the key's hinge point on wooden keyboards, you may crack the key or the wooden boss on the keyboard cabinet that holds the spindle. On older accordions with the key rod driven into the wooden key like a nail, you also risk loosening the key rod's connection to the key, necessitating a time- consuming repair.
The correct way to bend key rods is with two bending tools, one gripping the rod on each side of the point where you want to make the bend. For raising or lowering the key, place the bend as close as possible to the key. If this puts the pallet out of parallel with the foundation plate, causing the valve to leak, then make the compensating bend as close as possible to the pallet. All this is explained in more detail in the article on setting up a treble keyboard. The main thrust of this article is to describe the bending tools and how to make them.
The simplest tool is a steel rod with a slot cut in one side of it just the right depth and width to grip the key rod. The problem is that key rods come in many sizes, creating the need for many tools unless you make a set of adjustable tools. We'll get to a couple of designs for adjustable tools shortly, but first let's cover the simple ones. If you are only working on one accordion, then a few simple tools may be all you need. Here is a photo of some of the non-adjustable bending tools I have made from steel rods and bolts. The narrower tools are essential for working on short key rods.

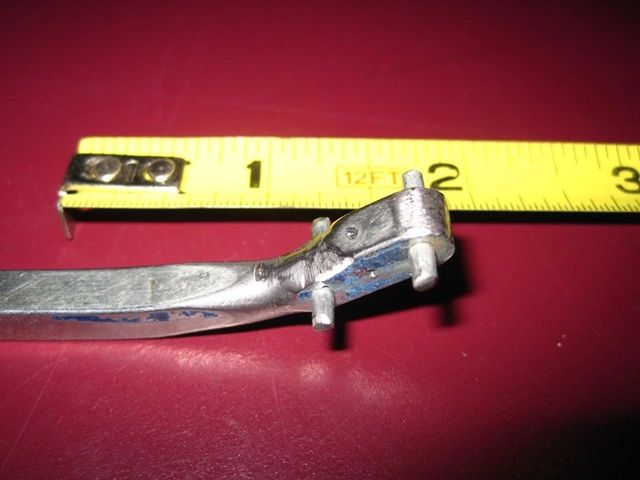
The first and second tools from the right, with large grip handles and with slots in the end, are for bending the key rod side to side in order to center the pallet over its ports. The fourth and fifth from the right are for twisting the flatbar style of key rod in order to rock its pallet into parallel with the foundation plate. Note that in each case pairs of tools are used together. The third tool from the right has small pegs through it to engage the key rod, and is useful (in conjunction with one of the other tools) for putting bends very close to the pallet. Here is a close up photo of it.
Adjusting valves down inside a tone chamber requires special tools that reach down into the chamber. The seventh and eighth tools from the right in the top photo have worked well on some tone chamber accordions, but I expect to have to make different tools with different slot widths to fit other accordions which have different key rod widths.
My tool design is still evolving, and I expect it will continue to improve. If you come up with any better tool design ideas, I hope you will share them with me.
When designing your bending tools, keep four considerations in mind. The first is that the tool must be narrow enough to fit down between adjacent key rods. This dimension varies with different accordions, but bulky tools just won't fit. The second is that wider tools with longer slots to grip the key rod do less damage to the soft aluminum key rods (very narrow tools cause unsightly gouges in the aluminum). The third consideration is that for the short key rods on the black keys, wider tools are not practical, since they do not allow you to put one bend close to the key and another bend close to the pallet. Tools wide enough to preclude any damage to the key rod are also wide enough to occupy the entire length of a short key rod when used in pairs, eliminating any choice on where to place the bend. For your black keys, you will therefore need narrow tools and you will have to live with the divots they leave in the key rods. The fourth consideration is that when raising a key, you will have to move the tools toward each other, and their handles may need to bypass each other in order to make the desired bend, so slender handles work best.
You can help minimize key rod damage by making your narrower tools from square rod, rather than round. For any given tool width, this maximizes the contact surface between the tool and the key rod, thus spreading the load. You can also minimize the damage by making the slots just barely wide enough to receive the key rod. A tight fit helps maximize the contact surface between the tool and the key rod, spreading the load over a wider area, thus minimizing the damage.
Making your bending tools about six inches long will give you sufficient leverage to bend the key rods. Minimizing the amount of rod extending beyond the lower edge of the slot will help make the tool fit closer to the pallet, making it possible to get your two bend points farther apart, which is particularly important on the black keys and any white keys with short key rods.
Here is a photo of some adjustable bending tools I have recently made. The one on the right has a slot in the lower jaw to straddle the key rod extending down into a tone chamber.

In the next photo the three on the right above have been disassembled so you can see how they are made. The set screw threads into one half of the tool and rides in a slot in the other half of the tool. The one in the middle has an adjustable slot on each end. The two halves of that tool were made to different lengths to provide different adjustment ranges at each end of the tool. The three extra holes in the tool on the right are unnecessary. They were already in the angle before I converted it to this use.

The adjustment, of course, is to allow for gripping a wide variety of key rods of varying thicknesses. I made the tool on the left from some recycled cold formed slotted channel (originally used to mount adjustable shelf brackets to a wall), and from some 1/4" steel plate I cut from a scrap of 4-inch wide 1/4-inch flat bar. To eliminate the need for a bulky nut, I tapped #10-32 threads in the 1/4-inch plate to receive the pan head set screw. When slightly loosened, the set screw can slide in a 3/4-inch long slot cut into the web of the channel. This gives me an adjustment range of 9/16- inch (3/4-inch minus 3/16-inch for the diameter of the #10 machine screw).
I am not a professional tool designer. Although these tools serve their purposes, I am sure more elegant designs are possible, and I encourage you to experiment. If you care to share your improved design, I would love to know about it. - GB
To return to the table of contents, click here
Treble keys sometimes stick open due to dirt or corrosion on the key or the spindle (axle rod), due to warping of wooden keys, or due to bending of aluminum keys.
Repairing a key that sticks open requires removing the key, after first removing the grill and possibly the treble switch assembly. On accordions without individually removable keys, pull the spindle out far enough to release the sticking key.
Look for the ends of the spindles (or spindle) under a small metal cover on the bottom of the keyboard. If you remove the spindle or spindles without first securing the keys in place, the key springs will fling the keys off the keyboard one at a time as the spindle is withdrawn, so plan to catch them. If they are not already numbered, number each key as it comes off to facilitate getting them all back in their proper places. The usual numbering system is 1 through 41 starting at the bottom of the keyboard if all keys are on one spindle. If there are two spindles, the black and white keys are numbered separately.
If you prefer not to remove all the keys above the problem key, and if there are two spindles, you can tape the keys together so that one spindle will hold all keys in place, as described in the following paragraph. If there is only one spindle, you can avoid removing all the keys by clamping them in place in accordance with the paragraph after that.
If white and black keys have separate spindles, you can usually avoid removing other keys by taping all the keys (except the keys to be removed) to each other before pulling out the appropriate spindle. (Use 3M Scotch Brand #218 plastic masking tape, as other tapes leave a sticky residue). Place one row of tape near the ends of the white keys and two rows over the black keys, taping to the tops of the white keys and to the sides and tops of the black keys. If you pull out just one spindle, the other spindle and the tape will hold all the taped keys in place.

If there is only one spindle for all the keys, you can clamp in place the keys you do not wish to remove, using large spring clamps with extended jaws to hold rods and shims against the keys. A single clamp can hold a wood ruler or similar shaped plastic or aluminum rod across the ends of the white keys, pressing them all down under the clamp's spring pressure. Two other long-jawed spring clamps (bolt 6-inch wood, plastic, or metal extensions to the jaws) can be used to press another similar rod down onto the white and black keys right where the black keys emerge to the level of the tops of the white keys, i.e., at the key hinge point. Finally, a third rod is used as a shim between the extended clamp jaws and the tops of the black keys to help hold the black keys in place. Just make sure none of the rods or shims extends out over the keys you wish to remove.
Grip the end of the spindle with small vice-grip pliers, and twist while pulling. Pull the spindle out just far enough to release the sticking key. Lift the key out, carefully noting the placement of the key spring. The free end of the spring must point toward the outer end of the key (not toward the valve), and usually rides in a tiny groove in the wood. Note that this technique does not work on a few models in which both spindles pass through holes in each key. In this case both spindles must be at least partially withdrawn in order to remove any key from either spindle.
While you have the spindle partially out, take a close look at it. If it appears dirty or corroded, remove it entirely and clean it with steel wool before reinstalling it. Inspect the key and the keyboard slot for any dirt or lint that could cause the binding, and for shiny spots that indicate where the key is rubbing.
For all-wood keys, sand away the shiny spot, finishing with 600 grit sandpaper. For wooden keys with aluminum core, and for all-aluminum keys, very slightly bend the short aluminum tab on the bottom away from the side where it was rubbing to eliminate interference with the slot in the aluminum keyboard. If this tab appears worn or scratched, you should also smooth it out with fine sandpaper and finish it with steel wool. Another option is to shift the key to one side by slightly bending the key hinge. Keep in mind that a very tiny bend at the hinge point results in a relatively large sideways shift out at the end of the key.
Reinstall the key and its spring and reinstall the spindle, taking care not to bend it. To avoid bending it, remove a drill chuck from a drill motor (or buy a new drill chuck) and slide it onto the rod, tightening it about four inches from the bottom of the keyboard. Use the chuck to twist and push the rod in, then loosen the chuck, slide it back, tighten it, and push again. If the spindle is brass, avoid marring its finish. You may have to press the keys slightly down into proper alignment to allow the spindle to pass through. The end of the spindle is tapered, so you may be able to see the keys move slightly as the point enters the bore and forces the keys to center themselves on the spindle.
If your accordion has a tone chamber, you may find that some of the black key rods intertwine with some of the white key rods in a way that makes it impossible to take out just the black keys or just the white keys. Similarly, you may find that both spindles pass through separate holes in each key. In either of these cases you will have to pull out both spindles and when you put it back together you will have to install black and white keys and both spindles together, and the drill chuck idea will not work because the spindles are too close together.
To solve this problem you can make aluminum, plastic, or hard rubber jaws for your small vise grip pliers that allow you to grip each spindle from the side an inch or so away from where it enters the cabinet without marring the smooth finish on the spindle. Here is one I made by hammering some 1/8" aluminum flat bar around the jaws of an old pair of vice grip pliers. I squeezed those jaws around a file spinning in my drill press to form a rounded groove across each jaw to better grip the spindle.

Here is a keyboard going back together using those pliers.

If there is no cover on the bottom of the keyboard and no access to the bottom ends of your spindles, then the keys are individually removable. Individually removable keys have slots that engage a spindle that can only be removed after all the keys are out.
There are five basic types. The most common type uses a short, stiff retainer spring to hold the spindle in the horizontal leg of an L-shaped slot in the bottom of the key, or more accurately, an L-shaped slot in the brass hinge assembly riveted to the bottom of the key. You cannot see this spring or the slot until you get the key out.
You remove these keys by pressing down hard and toward the valve end of the rod in order to get the spindle out of the horizontal leg of the L-shaped slot (by overcoming the force of the retainer spring) and into the vertical leg, then pulling up on the key to lift it off the spindle. Press on the key right where it rotates on the spindle, pushing down and horizontally, then lift vertically by gripping the key rod as close as possible to the key. In this explanation, horizontal means parallel to the key top.
Once you have your sticking key out, inspect and repair it as above. To reinstall the key, place it back in its slot with the stiff spring against the keyboard side of the spindle and press the key in the direction of the valve to compress the stiff spring in order to allow the spindle to enter the vertical leg of the slot. As you press the key down, the stiff spring will force the spindle into the horizontal leg of the slot to hold the key in place.
A second type of removable key is similar, except they have only a vertical slot (no horizontal leg) and a short coil spring to hold the key in place that must be removed first. With the grille off, you can peak in under the backs of the keys and see these little springs. In these cases, there is often a little tool fastened to the underside of the grille or to the foundation plate under the grille. If not, you can make one from a small screwdriver or any slender steel or aluminum rod. Here are a couple of photos of one I made.

The upper end of the coil spring stays connected to the key; you remove the bottom end of the spring from the aluminum tang by pressing the loop on the end of the coil spring downward and off the free end of the tang. You can remove them with practically anything, but you will need the special tool to put them back on.
There is a third type of removable key that has a simple aluminum fork on the bottom of the key that straddles the axle of a brass bushing that rotates on the spindle. This type always has the little coil springs described above. After removing the spring, you just pull straight up on the key, using a good grip on the key rod. Some of these are really stubborn and you have to pull really hard with pliers. It is not unusual to have to pull so hard that when it finally suddenly releases, you are unable to stop before the pallet hits something and is knocked off the key rod, so you should have some reed wax handy to wax it back on. See the article on waxing with a modified soldering iron for more details. If you don't get it waxed back on in exactly the same position, and if the leather seal has "pillowed" into the ports, it will leak due to the "pillow" no longer aligning properly with the port, in which case the best solution will be to replace the felt/leather laminate valve facing on that pallet. See the article on "re-valving the treble side".
If you have these forked keys and brass bushings, and if you conclude that your problem is high friction between the brass bushing and the spindle or between the brash bushing and its slot in the aluminum chassis, then you will have to take all the keys out and remove the aluminum keyboard chassis from the accordion in order to get the spindle out to clean it. In this case, all the brass bushings will fall out as you remove the spindle, so figure a way to catch them.
You can clean them in a little jar of WD-40, agitating it well, then blow them dry with compressed air. Test each of them on the spindle to make sure they all turn freely. Doing this may help clean additional corrosion and dirt out of the interior bore in the bushing.
As you put them back in their slots in the aluminum chassis one at a time, feeding in the spindle as you go, make sure each one turns absolutely freely on the spindle and in its slot in the aluminum chassis before installing the next one. The bushings vary up to .004 inch in width, and if you happen to get one of the wider ones in one of the narrower slots in the chassis, it may rub on the chassis.
In this case, either find a narrower bushing or file the slot a little wider, but not too wide, or the key may wander too much and interfere with a neighboring key. Every bushing must turn absolutely freely in its slot and on the spindle in order for the keyboard to work smoothly.
If some of the key forks are too tight to fit over the brass bushing with moderate pressure, check the sides of them for burrs or spalling and sand these off smooth. If you conclude that the fork is too narrow, you can file it a bit wider, but don't file too much, or the key will be sloppy. You want a snug fit. Don't use any oil, as it will attract lint and dust, which will eventually gum it up and cause keys to stick.
This type of keyboard takes longer to clean and adjust, but in the end you will be rewarded, because once it is cleaned and properly adjusted, this design offers the smoothest keyboard action of all.
The fourth type of individually removable key is held in place by a sliding clip on each key that slides in under the spindle. Use a flat blade screwdriver to pry the clip away from the spindle (that is, toward the valve end of the key), and lift the key straight up. To replace it, press the key down over the spindle and slide the clip back in.
The fifth type has a slotted head twist-fastener right above the spindle on each key. Use a flat blade screwdriver to turn the slotted head of the fastener 90 degrees left to release the key, then pull the key straight up. To put it back, press the key into position over the spindle and turn the fastener 90 degrees to the right.
In all cases, test the key for smooth action before returning the accordion to service.
To return to the table of contents, click here
TROUBLE-SHOOTING SILENT REEDS
Silent reeds might be missing, loose, misaligned, or broken, but usually they are just stuck because of foreign matter lodged between the reed tongue and the vent (slot in the reed plate). The hardest part is to positively identify which reed tongue is silent. You can always use your tuning bellows to test each reed in each reed block, in each airflow direction, out on the workbench. But there is a quicker way.
First determine which switch controls the problem reed, and in which bellows direction the problem occurs. Then open the accordion and take out the reed blocks to determine which slides are opened by that switch. This tells you which row on the reed block contains your problem reed. Now press the problem key to see which valve opens, and hence, which reed plate in that row contains the silent reed (for example, the fifth valve controls the fifth reed plate in the reed block).
If the reed was silent only when the bellows was expanding (air rushing in), then the problem is with the reed tongue on the inside of the reed block, behind the visible leather. If it was silent only when the bellows was compressing (air rushing out), then the problem is with the reed tongue facing you, on the outside of the reed block.
If it is the outer tongue, you might cure it by simply plucking it lightly with a single edge razor blade slipped carefully under the tip (to avoid scratching either the reed or the reed plate). Pluck it just enough to get it vibrating. If you can hear the tone of the reed at all, you have probably already cleared it. But if it sounds dull, you may need to take further measures to dislodge foreign matter from between the reed tongue and the vent.
Try passing a .0015” metal feeler gauge between the sides of the reed tongue and the vent (slot in the reed plate), but don’t push it in very far, or you will dislodge the leather glued to the opposite side of the reed plate. Then pluck the reed tongue again to see if it seems to be vibrating freely. You can also test it on your tuning bellows if you have one. However, you should avoid blowing the reed like a harmonica, as this could get moisture on the reed, causing it to rust.
If the problem was with the inner tongue, try the feeler gauge approach. You will not be able to pluck the reed to check your progress, but you can test it on your tuning bellows, if you have one.
If passing the feeler gauge around the sides does not clear it, check the tip. The feeler gauge is too wide to use to clean the narrow end of the vent, but you can use it to clean off the tip of the reed tongue and also to lift the reed tip out of the way (not too far, as you do not want to bend it permanently) while you clean the end of the vent with a tiny brass wire brush, or a straight pin, or even a toothpick.
If cleaning fails to solve the problem, then check for misalignment of the reed tongue that causes interference between the reed tongue and the vent. You will probably have to pry the reed plate out of the wax to do this, then wax it back into the reed block after you have repaired it, so if you are not prepared to wax it back in, you should take it to a repairman. If you proceed on your own, hold the reed plate up to a bright light to verify that you have the tongue centered. If the tongue is out of center, pry it back into position. If it moves at all easily, you may have to reset the rivet with a light hammer blow (on an anvil, naturally) after you have the tongue centered.
To return to the table of contents, click here
VOICING REEDS
You can often significantly improve the performance of your accordion by voicing the reeds. Voicing is setting the tip clearance of the reed tongue above the plane of the reed plate. If the tip is set too high, too much air will escape under it, delaying the onset of vibration, requiring more air to get it started. If it is set too low, it will choke under high bellows pressure. That means it will refuse to vibrate, perhaps because it closes off the reed vent too soon, before it has achieved enough velocity and momentum to travel far enough to cause a rebound powerful enough to start the oscillation.
Changing the tip clearance obviously requires permanently bending the reed tongue. You can't voice the reed just by lightly flexing it or by gently stroking it, or it will simply spring back to its original position. If you want it to take a permanent set at a new level relative to the reed plate, then you have to bend it far enough to exceed its elastic limit (which by definition is the bending limit beyond which it will not spring completely back to its original position).
However, you also want the reed tongue to remain straight and parallel with the top of the reed plate or angled slightly up from it, but not having any curvature, so you have to make sure the permanent bend occurs very close to the rivet. You can't just grab it by the tip and push or pull, or the bend might occur somewhere midway along the reed tongue, or perhaps even close to the tip, especially on the smallest reeds.
To get it to yield close to the rivet, you should apply the force at least half way down the tongue. This is where the reed tongue is wider and possibly thicker, and where you have the least leverage, so you have to push or pull pretty hard, and there is the rub. If you push or pull too hard, the permanent deflection may be greater than you want, in which case you will have to bend it back the other way by exceeding the elastic limit again. There is a limit to the number of times you can do this, because each time you exceed the elastic limit, you raise the elastic limit of the steel in the area of the bend so that even more force will be required to exceed the elastic limit at that location next time (this is sometimes called "work hardening" - you can see it in action by repeatedly bending and straightening any steel wire, such as a paper clip).
As the elastic limit increases due to bending beyond the previous elastic limit, by definition the area of the bend becomes more resistant to permanent bending, so the next permanent bend tends to occur somewhere else, where the elastic limit has not yet been raised, and where it will therefore yield under less applied force. In practice, this means that if you want your permanent bend right next to the rivet, you have to get it right the first time, or at least very soon after that. If you exceed the elastic limit very many times, your bend might end up farther away from the rivet. If you somehow force it to bend at the exact same spot each time, then its elastic limit at that point will eventually be raised to the ultimatum yield point, at which point the reed tongue will break, rather than bend.
This is not to say that there is a limit to how many times the reed can flex before it breaks. As far as I know, there is no such limit, as long as it does not flex beyond its elastic limit. Reeds flex millions (or maybe billions) of times during the life of an accordion, so you can try as many times as you like to bend the reed short of reaching its elastic limit, and you will not hurt it, but of course, you won't change its voicing, either.
This all suggests that the best way to voice a reed is with several attempts, starting gently, and gradually increasing the applied force with each trial, checking each time to see if the latest attempt has succeeded in making a permanent bend. There is no penalty for applying too little force, other than a slight delay in reaching your objective. With experience, you will learn how much force to apply the first time, so you can avoid wasting a lot of time working up to the elastic limit, yet still be reasonably certain that you will not exceed the limit on your first try.
I say "reasonably certain" because reeds vary in hardness and in their elastic limits, and even after you have experience, you will undoubtedly encounter some reeds that are much softer and with lower elastic limits than most, and which take a permanent bend much sooner (and farther) than you expect. When this happens, you should reduce the force you use in subsequent trials, and try to work gradually up to the lower elastic limit of that particular reed.

The tools used in voicing are very simple. For lifting an exterior reed tongue to increase its tip clearance, you just need a thin piece of metal to get behind the reed tongue and evenly support the upper half to two thirds of it while you bend it upward. I use a dull single edge razor blade on small reeds, and a .010" metal feeler gauge on larger reeds.


For lowering an exterior reed tongue to decrease its tip clearance, you apply force in the lower half of the tongue, forcing it down into the vent. I use a flat blade screwdriver with a tip narrow enough to pass through the vent without scratching the sides. To avoid letting the screwdriver slip toward the tip of the reed tongue, I hold the screwdriver shank nearly parallel to the reed and rock the tip into the tongue, rather than poking it straight in.

If you are voicing an interior reed tongue on a reed mounted in its reed block, the process is similar. To increase the tip clearance, rock the screwdriver tip down into the vent and against the tongue at a point about a third of the way up from the rivet. If you try to leave the leather on while you do this, you are likely to damage it, so I think you are better off to remove the leather to better see what you are doing, as well as to allow you to work from the fixed end of the reed tongue. Glue the leather (or a new one) back on when you are finished.

On larger reeds, you often must push the tongue so far in that it hits the back of its reed chamber and visibly bends to conform to the limits of the chamber. There is some risk that in addition to bending near the rivet, the tongue will bend in the opposite direction about where it contacts the back of the reed chamber. Such a bend puts undesirable curvature in the reed tongue, making it impossible to voice it correctly until it is straightened. If you are exerting force at about the 1/3 point, the reed tongue will nearly always reach its elastic limit near the rivet before it does in the area of the reverse bend, but not always.
The major exception is with some handmade reed sets in which a few of the largest treble bassoon reeds have a a very thin cross section near the rivet and a step up in thickness about half way out from the rivet. On those reeds, the tongue will reach its elastic limit and take a permanent bend near the rivet, but it is also likely to take a permanent bend in the reverse direction right at the step up in thickness, somewhere near the middle of the reed tongue. If this occurs, you will have to remove the reed from the reed block to straighten that tongue before you can voice it. To save wear and tear on the reed, it is best to remove this type of reed from the reed block before you try to increase the tip clearance of the inner tongue. Increase the clearance to match the clearance of its properly voiced twin on the opposite side of the reed plate, then wax it back in.

This Binci handmade reed has been flipped over to show what happened to the interior reed tongue when I tried to increase its tip clearance without removing the reed from the reed block. The reed would no longer sound until after I removed it, straightened it, properly voiced it, and waxed it back in.
To decrease the tip clearance of an interior reed tongue, you must push the tongue up into the vent. This is the trickiest scenario, because you must work through the hole in the bottom of the reed block, where it is hard to see exactly where your tool is contacting the reed tongue. In addition, the upward force you apply on the reed tongue might jack the reed plate right out of its wax mounting if you don't adequately support it. It is also harder to see and properly judge the amount of tip clearance and any impact you are having on it.
Start by laying your pry bar (narrow screwdriver) on the exterior face of the reed plate to measure how much of the shank you will want inside the reed block in order for the tip to contact the interior reed tongue at the desired point, i.e., 1/3 of the way from the rivet to the tip. Make some kind of mark on the shank, then insert it up to the mark and align it with the interior reed tongue. As you rock the handle downward, using the interior edge of the reed chamber as a fulcrum, the screwdriver tip and the reed tongue will rise into the vent. Be sure to have a firm grip on the reed plate, squeezing it onto the reed block to prevent the upward force of the tool from pushing the reed plate out of the wax. As always, be gentle at first. Rock the tongue a little ways up into the vent, then check the tip clearance to see if you have decreased it. You want to approach the elastic limit of the reed tongue gradually, so as not to significantly overshoot.


The goal is to have the minimum possible tip clearance that will not cause the reed to choke. Unfortunately, there is no way to know where the minimum is until you exceed it. Different reeds have different response times, even when properly voiced, so if you are really after the absolute best performance your reeds can deliver, you can’t simply stop when the response seems pretty good. Well, you can, and in fact that is almost certainly good enough, but who among us can stop there, if there may be some possibility of getting even better response?
To get the absolute best possible response, you need to find the point where the reed begins to choke, then widen the clearance the minimum amount to get it to not choke. If you are opening up the clearance on a reed that has already been choking, this just comes naturally. But if you are narrowing the clearance on a reed that has been responding too slowly, then you will have to keep narrowing it bit by bit until it begins to choke under sudden high pressure on your test bellows. Of course, that means you have gone too far, and will have to exceed the elastic limit one more time to put it right, but that’s okay, as long as you don’t do it too many times.
Voicing requires patience. After several failed attempts to change the tip clearance, frustration can cause you to suddenly get too rough with it and bend it too far. It is important to very gradually increase the force applied with each attempt, i.e., bend it just very slightly farther each time, until you just barely exceed the elastic limit. You will know you have barely exceeded the elastic limit when the reed tip returns to a slightly different clearance than before.
The optimum clearance is often about one reed tip thickness above the reed plate. However, this varies slightly from reed to reed, so simply measuring the clearance will not ensure optimum performance. You have to check it on your test bellows. Decrease the clearance a tiny bit at a time until you can just barely make the reed choke with a sudden onset of high bellows pressure on your test bellows, then back it off the minimum amount required to eliminate the choking.

You have to be especially careful when voicing the very smallest piccolo reeds, as they are very thin and bend readily (the smallest ones are only about .002" thick near the free end).The optimum tip clearance under the reed tongue is often too small to see without magnification (sometimes as little as .0015"), making the required changes likewise too small to see. In this case you will be unable to monitor your progress visually unless you remove the reed from the reed block and view it under moderately high magnification, say 10x to 20x. In the absence of such magnification, if you actually see a change in tip clearance, you have almost certainly gone too far. It is very easy to bend these tiny reeds too far, or to ruin them by putting a visible bend or kink near the tip of the reed tongue. You want the bend to be imperceptibly small, and located very near the fixed end of the reed tongue. It is best to remove these tiny reeds from the reed block, make your bends under magnificaiton so you can see your progress, test the voicing by placing the reed directly over the opening on the top of your test bellows, and wax the reed back into the reed block only after both its tongues have been properly voiced.
You should push on these tiny reed tongues only within the bottom half of their length, and gently. Use a wooden toothpick or a tiny screwdriver or similar tool, taking extreme care not to let it slip toward the free end of the reed tongue, or you may inadvertently bend just the tip, which will ruin the reed (unless you are patient enough and fortunate enough to be able to straighten it under magnification, as described on page "Accordion Repair 3" near the end of the tuning article).
When adjusting the tip downward, a good way to maintain control of your tool and of the pressure you apply is to rest the shank of your tool on the reed plate at the top (narrow) end of the reed vent, and rock the tip of your tool downward against the top of the reed tongue, forcing it down into the vent. This gives you precise control over how much pressure you apply, how far you deflect the reed tongue, and exactly where on the reed tongue you apply the pressure.
Similarly, when lifting the tongue, support it along more than half its length, rather than just pulling on the very tip. Slide a dull single edge razor blade or a .002" metal feeler gauge under the reed tongue to lift it. Be very careful not to bend it too far. If you actually feel it yield, then you almost certainly have gone too far and may have ruined the reed. It is best to begin with very light pressures and minimal deflections, checking each time on the test bellows to see if you have improved the voicing.
It is impossible to voice these smallest reeds if they have been arched by excessive pressure during tuning, or if their tips have been bent up or down or twisted during tuning or voicing. You can sometimes hear the hiss of air escaping under these arched or twisted reed tongues before they begin to sound (if they sound at all). The easiest thing to do in these cases is to replace the reeds, but it is sometimes possible to straighten them. Take them out of the reed block and use 10X to 20X magnification to precisely locate the bends that need to be taken out, and to monitor your progress. Only after they are straightened can they be properly voiced. See the tuning section on the Accordion Repair 3 page for some suggestions for making and using bending tools under magnification.
After all this bending and straightening, these tiny reeds will almost certainly be out of tune, so you will have to tune them. Hint: Use #220 grit or finer sandpaper and light pressure, rather than a file or scratcher, both of which are far too blunt and crude for these tiny reed tongues. The use of inappropriate tuning tools is probably what ruined these reeds in the first place. To make an appropriate tuning tool, you can wrap and glue narrow strips of fine sandpaper over the ends of short wooden rods, approximately 1/8" square by three or four inches long. See the tuning section on the Accordion Repair 3 page for more information.
Regardless of the size of the reed, voicing the exterior reed tongues is fairly straightforward because you have good access and (except on the smallest reeds) you can easily see your progress as the tip clearance increases or decreases.
Seeing and judging the tip clearance of interior reed tongues, however, is more difficult. The apparent tip clearance varies with your viewing angle, so to monitor your progress it is important to view it from the same angle each time. It is also more difficult to bend the reed tongue outward, as you must work through the small opening in the bottom of the reed block.
On the smallest reeds you will have to take special care not to press too near the tip of the reed tongue, and this is especially difficult to judge when working in such a confined space. Sometimes the geometry of the reed chamber will not allow you to use a straight tool to bend the reed tongue, in which case you will have to use something curved or bent. I solve this problem by using a couple of very small screwdrivers that I have bent for this purpose.

If it seems easier, just take the reed out of the reed block while you voice it, then wax it back in.
Good reed response is very desirable in an accordion. Many accordion players pay thousands of dollars extra for top quality accordions with handmade reeds because handmade reeds respond more quickly. Slow responding reeds throw off the timing of the music and cause your accordion to use more air. Fast reed response is especially important when playing very fast pieces and when playing softly, but is noticeable and very pleasing in any kind of playing. Whatever the quality of your reeds, you can optimize their response by ensuring that they are properly voiced.
To return to the table of contents, click here
Piano Accordion Trouble-shooting Guide
Problem/Possible causes Remedies
Bass terminology: The button is on the end of a piston which has pegs or tabs that engage levers on bellcranks (also called cams or pipes). When pushed by the peg on the side of a piston, a lever rotates the bellcrank to which it is mounted. The rotating bellcrank has another lever on it (the actual cam) which engages the lifting arm on the valve, opening the valve as the bellcrank rotates. Remedies marked with * require totally removing (and in most cases this means disassembling) the bass machine for access.
Sticking bass buttons
Bent piston Straighten the piston.
Broken slotted wooden guide
(usually at screw holes) Glue or remove the chip, file
or sand the slot clean.
Lint between the piston &
slotted wooden guide Clean the piston and the slot.
Corrosion on piston at wooden
guide Remove corrosion, clean the slot.
Cam lever disengaged from
piston peg (slipped above peg) Re-engage, bend the lever to stay
engaged.
Cam lever rubbing on side of
piston peg Bend lever away to eliminate
friction.
Bass note sounds after button returns
Friction between cam & follower
due to worn metal on each *Sand & polish the cam & follower.
Friction between pipes due to
grime or too tight restraints *Clean pipes or loosen restraints.
Bent pipe *Straighten the pipe.
Pallet misaligned with its ports *Align the pallet with its ports.
Valve leather deteriorated or
delaminating from pallet *Re-valve the pallet.
Disengaged or misaligned pallet
spring *Install the spring properly.
Disengaged or loose valve hinge *Re-anchor the valve hinge.
Foreign matter (wood, wax, or lint)
under leather valve Remove the foreign matter, working
from the reed block side
Bass linkage too tight (lever
under pressure with button up) Re-adjust the cam levers to eliminate
the pressure.
Treble key sticks down
High friction on spindle from
corrosion or lint Remove and clean the spindle and the key.
Warped wooden key rubbing on
wooden guide beneath it Sand the wooden key and/or its guide to operate freely.
Bent aluminum key rubbing on
aluminum guide slot Bend the aluminum tab on the bottom of the key to center in the slot.
Plastic key or key-top rubbing on
neighboring key Sand the plastic to eliminate the interference.
Key rod interference w/ other key,
switch linkage, etc. Bend the key rod to clear the obstacle.
Misaligned key return spring
(or maybe weak or broken) Align or replace the key spring.
Treble note sounds after key returns
Pallet misaligned with ports Bend the key rod to center the pallet over its ports. Also, re-valve the pallet.
Pallet out of level Twist and/or bend the key rod to level the pallet. Then re-level the key.
Key rod sagging due to worn
spindle bore in wooden key 1) Ream the spindle bore in the offending key to fit the outside diameter of brass tubing which has an inside diameter to fit the original spindle and install a piece of that tubing as a bushing in the key, or
2) Ream the spindle bore in all the keys on that spindle and ream the bore for that spindle in the keyboard to the next standard size and install an oversize spindle.
Valve leather deteriorated or
delaminating from the pallet Re-valve the pallet.
Foreign matter (wood, wax, or lint)
under the leather valve Remove the foreign matter.
Pallet warped Strip the pallet, sand it flat, re-valve it.
Weak sounding note
Leather anchored too tightly Replace the leather with less glued anchorage.
Leather too stiff for small reed Replace the leather with a thinner leather or mylar reed valve (ventillo).
Slide partially closed Adjust or repair the slide switch linkage.
Leather fallen off inside the reed
block, partially blocking air flow Replace the interior leather.
Pallet not lifting far enough to allow
sufficient air through the reed Adjust the key rod, level the key.
Leather valve delaminating from
its pallet, blocking air flow Re-valve the pallet.
Reed tongue wandered off-center
in its vent Center the tongue, reset the rivet.
Foreign matter lodged between the
reed tongue and its vent Clean the reed.
Loose reed block Tighten the reed block anchorage clamp. Shim the other end as required for a snug fit.
Warped reed block Sand the bottom of the reed block
flat, readjust its anchorage.
Silent reed
Foreign matter lodged between the
reed tongue and its vent Clean the reed tongue & vent with air, a brush, or a .0015" feeler gauge.
Broken reed tongue Replace the reed.
Reed tongue wandered off-center
in its vent Center the tongue, reset the rivet.
Insufficient tip elevation above the
reed plate Voice the reed (adjust its tip elevation).
Interior leather has dislodged and
is blocking air flow Replace the leather.
Reed has fallen out of reed block Re-wax the reed.
Slow reed (requires more air)
Excessive tip clearance Voice the reed (adjust its tip clearance).
Insufficient tip elevation (reed is
close to choking) Voice the reed (adjust its tip clearance).
Excessive side clearance between
the reed tongue and its vent Replace the reed.
Arched reed tongue, bent by
excessive tuning pressure Straighten the reed tongue or replace the reed.
Slide partially closed Adjust slide switch linkage
Valve not opening far enough Set deeper key action or convert to compound levers.
Reed out of tune
Missing or inoperative leather on
opposite side of the reed plate Replace the leather.
Missing or inoperative leather on
the near side of the reed plate Replace the leather.
Grime on the reed tongue Clean the reed tongue.
Rust on the reed tongue Replace the reed, or remove the rust and tune the reed.
Reed tongue cracked Replace the reed.
Lead weight on reed tongue
deteriorating Replace the reed.
Slide partially closed Adjust the slide switch linkage.
Reed out of tune for unknown reason Tune the reed.
Reed requires frequent retuning Replace the reed.
Reed goes flat under pressure Reset the rivet
Warbling reed (one reed sounding)
Arched leather Replace the leather.
Reed loose on the reed block Re-wax the reed.
Warbling reed (two reeds sounding)
One of the two reeds is out of tune Identify which reed is out, then remedy it. (See “Reed out of tune”, above).
Two notes sound when only one
key is pressed and only one reed
set is turned on
Interference between key rods
(one lifting another) Bend one or both key rods to eliminate the interference, then adjust those valves to seal and level those keys.
Interference between pallets
(one lifting another) Bend key rods to adjust pallet positions.
Internal air leak between adjacent
reed chambers Seal the leak with hot wax.
Uses too much air First, determine whether there are any external leaks. See the chapter titled “Finding Air Leaks”.
Possible sources of external leaks: Remedies:
Bellows gasket leaking Replace the bellows gasket.
Bellows metal corner leaking Remove, glue, and reinstall the metal corner, or a new one.
Loose or missing screw in the
treble or bass cabinet Tighten or replace the screw, or seal the hole with hot reed wax.
Loose bellows pin Replace with a slightly larger diameter pin.
Hole in the treble or bass cabinet Seal the leak with hot wax or fill it with wood and glue.
Crack in the treble or bass cabinet Glue and clamp the crack back together.
Leaking treble or bass pallet Realign the pallet and replace the valve facing.
Leak around switch linkage Seal with hot wax or replace the original seal.
Bellows porosity Replace the bellows.
Second, check for internal leaks. See the chapter titled “Finding Air Leaks”.
Possible sources of internal leaks: Remedies:
Loose or missing reeds Reinstall and/or re-wax the offending reeds.
Broken reed tongue Replace the reed.
Loose reed block Tighten the reed block anchors, install shims as needed.
Warped reed block Sand the bottom of the reed block flat.
Leathers missing or curled away
from the reed plates Replace the bad or missing leathers.
Poorly voiced reeds Voice the reeds.
Bent or arched reed tongues Straighten the reed tongues or replace the reeds.
Gap under the wax between
adjacent reeds Re-wax those reeds.
Air leaking through a hole in the
wood between reed chambers Seal the hole with hot wax or glue.
Noisy, clunky keys or buttons
Key clunks on the way down Replace felt key stop under the key. Reduce key travel
Key clunks on the way up Replace treble valve facing. Reduce key travel.
Key squeaks Clean spindle and key
Button clunks on the way up *Replace bass valve facing
CHANGING REED LEATHERS
The most commonly needed repair is changing reed leathers. A standard 120/41 LMMH accordion has about 380 leathers in it, and given enough time they will all eventually need replacing. They should lie flat against the reed plate, but with age they begin to curl back. If they are curled back more than 1/16”, they should probably be replaced, and if they are curled more than 1/8” they definitely should be replaced. Nearly all old accordions need at least some of them changed, and many need all of them changed. Changing leathers is not difficult, and you can save money by doing it yourself.
Bad leathers curl back like some of these:

Good leathers lie flat like these:

Marginal leathers hang open just a bit, like some of these:

Before you try to change any reed leathers, take the reed blocks out of the accordion. You might get away with taking out just the one you want to work on, but it is safer to take them all out so you don't accidentally catch any leathers and bend them back while trying to sneak a completed reed block back down between two that you left in the accordion. If you have a 4-reed accordion, your reed blocks should look something like this:

The outer leathers are very easy to change. You just strip the old one off and glue a new one on. To avoid throwing the reed out of tune, ensure that the new one gets anchored (glued) along the same amount of its length as the old one. The John Reuther book, Accordion Repair Made Easy, recommends using burnt shellac as glue, but burning the alcohol off a bowl of shellac until it becomes thick enough to use as glue seems a bit barbaric when you can buy equally good glue right off the shelf. Thanks to a tip from Kimric Smythe of Smythe Accordions in Oakland California, I have successfully used Indian Head Gasket Shellac or Versachem Lion Gasket Shellac, available in little brown 2 ounce plastic bottles at auto parts stores for about $3. One bottle is enough to glue several thousand leathers.
When you first open the bottle, you will find a uselessly large applicator brush fixed to the lid. Scrape the glue off it and back into the bottle, use side-cutter pliers to cut the brush stem as close to the lid as possible, and throw the brush away. You will be using wooden toothpicks to apply the glue to your leathers.
I have also successfully used Aleene's Original Tacky Glue, which comes in a convenient squeeze bottle. I squeeze a small bead of glue onto the end of the leather, then spread it with a wooden toothpick. This glue seems to stay soft better than the gasket shellac, and provides a stronger bond, but consequently is harder to remove. I'm sure there are many other glues that will work as well.
If you choose to scrape the old glue off the reed plate (recommended), use a hard wood scraper. Cut a piece about 1/4” x 1/4” x about 6 inches long, and use your belt sander to put a beveled “chisel” edge on the end to use as your scraper. For really tough old glue, you can resort to an aluminum scraper, or maybe even a brass scraper, but be careful not to scratch the reed plate. Aluminum and brass scrapers can be made by hammering flat the end of a small diameter aluminum or brass rod or tube and filing it to the desired shape. Steel scrapers are inappropriate, as they will far too readily scratch the aluminum.
Be sure to brush and shake out and/or blow away all the little bits of debris that might later lodge between a reed tongue and reed vent and silence a reed. An old tooth brush works well, as long as you are careful not to wedge a bristle between the reed tongue and the vent, which will be hard to get out. Scraping and brushing are worth the time. A little bit of cleanliness now will save you a lot of heartache later. However, don't use canned air, as it will chill the reeds and cause condensation to form.
Reed leathers come only in certain lengths, so you will usually have to cut the next larger size down to fit the reed vent. You want the fixed end of the leather to butt up against the rivet and the free end to extend only about 1/32” past the end of the reed vent. I use a single edge razor blade mounted in a window scraper to cut the leathers guillotine style. Cutting them with scissors does not work well, as it is nearly impossible to get a square cut.

Curl the leather in your fingers to put a small amount of curvature in it (smooth side out, fuzzy side in), to bias it toward the reed plate. Don’t put much curvature in it though, because if the center of it arches off the reed plate it will operate very noisily. You must make sure it lies perfectly flat on the reed plate.
Apply the glue sparingly to the fuzzy side of the leather (along only that part of its length that you wish to anchor), because you do not want any excess glue to run down into the reed vent. Use a normally closed tweezers to grip the leather by the free end. Place the fixed end against the rivet, make sure the leather is centered laterally over the vent, press it into place with a finger, then release the tweezers. If necessary, you will have a few seconds to properly align it before the glue sets up. It will be dry enough to play the accordion after about a minute.
Changing interior leathers takes more skill and patience than changing the exterior ones. It’s a bit like building a ship in a bottle, as you are working in a really confined space through a very small opening. A headlamp is absolutely essential for seeing into the reed chamber while you work. Pull the old leather out with tweezers, and don’t even try to clean the old glue off the reed plate, as it will be impossible to get out all the debris you will generate. It is better to leave all that stuff undisturbed and anchored into the new glue.
Cut the leather to the proper length using the exterior reed vent and leather as your guide. It is critically important not to make it so long that it will hang up on the end of the reed chamber. Put a small amount of bias (curvature) into the leather, just as you did for the exterior leathers.
Apply glue to the fuzzy side of one end of the leather, just as you do for exterior leathers, but this time you will have no choice but to grip the leather by the fixed (glued) end, which means you will inevitably get some glue on your tweezers. This will cause the leather to want to stick to your tweezers and come back out of the reed chamber with the tweezers when you pull the tweezers out. Sometimes you can prevent this by hooking the end of the leather behind the rivet, pulling the tweezers free, and letting the leather fall into place. It also helps to put a thin shim (the same thickness as the leather) between the jaws of the tweezers to prevent the tweezers from gripping the leather too tightly.

The next step is to align the leather with the vent and then pat it into place using a small flat blade screwdriver, making sure it lies perfectly flat. It is critically important to ensure that the leather is not so close to the sides or end of the reed chamber that it will catch on the wood while operating. It is equally important to ensure that the leather does not touch the reed tongue right beside it in the reed chamber, or that reed will be silenced. You must also be careful not to get any glue on that reed tongue, as the weight of it will throw the reed out of tune.
Finally, verify that the new leather operates freely by pressing the outer reed tongue into its slot far enough to lift the leather, and watching it fall back into place.
The larger leathers sometimes have little metal spines (contrapelli) attached to stiffen them. They are generally held in place by leather “dots” of either 6 mm or 8 mm diameter. You can either buy new ones or reuse the old ones. Place the metal spine centered on the leather, put a small drop of fabric glue on the fuzzy side of the leather dot (I use a toothpick embedded in the glue to transport the dot to the reed valve), and while you hold the spine firmly in place with one finger, use another finger to press the dot into place over one end of the spine. Fabric glue dries almost instantly, so work quickly.


I get my leathers, dots, and contrapelli from Letizia Bompezzo in Castelfidardo, Italy. I order via email, in English. I don’t know if she has a minimum order size, as I normally order several thousand leathers at a time. In these quantities the average cost of the leathers is usually under $.10 each, depending on the mix of sizes. However, the freight from Italy significantly increases that cost (shipping cost on a recent order was $59.00), so to save on freight charges I sometimes order when I am also ordering a bellows or some other major component from another supplier, and I ask Ms. Bompezzo to deliver the leathers to my other supplier for shipment in the same box, which she has kindly done.
She makes reed leathers in seven sizes, using thinner leather for the smaller sizes:
Size name Dimensions
Bassi 10mm x 60mm
Terzetti 9 mm x 49 mm
Ottavo bassi 7 mm x 46 mm
I 7 mm x 41 mm
II 7 mm x 36 mm
III 6 mm x 30 mm
IV 6 mm x 25 mm
She also sells composite leathers (leathers with a mylar sheet glued to the fixed end as a stiffener) as an alternative to using the little metal spines (contrapelli) to stiffen the larger leathers.
Here is her contact information:
Bompezzo Letizia
Via U. Foscolo, 33
60022 Castelfidardo (AN)
Italia
tel. 071 7822899
cell. 345 0016490
email: orlandoni.g@libero.it
If you prefer not to order from Italy or in large quantity, FRM Enterprises (frment.com) also sells leathers, but has a $100 minimum order. This is fine if you also need straps, back pads, and other supplies, which can quickly add up to the minimum, but if all you need is a few leathers or other accordion parts, try Steve Burnside Accordion Services in Black Mountain, North Carolina. Email targetentertainment.net@gmail.com. Steve is a dealer for FRM Enterprises and can accommodate orders below FRM's minimum amount.
Most accordions use real leather (goatskin) reed valves, as described above, but some designs use plastic "ventilli". Plastic ventilli are available in so many lengths that you seldom need to cut one to fit. You can buy them from accordion parts suppliers such as FRM Enterprises, or online. Some designs incorporate a hole to fit over the rivet, others are designed like leathers, to butt up against the rivet.
I have not tried using alternate materials, but one reader of this site, Donald Thornhill, offers the following alternate sourcing tip. These are his words: "I have found 1.5 mylar 1/4 inch wide audiotape to be excellent. 2 layers actually. One being shorter by 5/16 inch. I may be a little more cautious when I am at the last 25% of the 7 inch spool of tape as it will maybe have a little more curl from being on the reel. What I could do is maybe reserve that portion for the lower octave reeds vs the higher ones. Also, I put the oxide part inwards adjacent to the plate. I use epoxy for the glue...the kind that is in the two tubes. Best to avoid the cheap dollar store kind. The valves will allow themselves to be easily changed. You will also know it is 1.5 ml as a full 7 inch reel is 1200 feet (Not 1800 feet or 2400 feet etc.) Do not use acetate kind. Only the mylar. I am not sure of the kind marked polyester. A 3/16 inch glue area is enough. Make sure the end at the base is adjacent to the rivet and that the other end need only just cover the end of the reed window. You have to keep in mind that the inside valves are just about no clearance from the wood in many instances."
Plastic ventilli do not curl over time, and seldom need to be replaced unless damaged by careless handling. Even accordions using plastic ventilli on most of their reeds usually have leathers on the largest reeds, and sometimes have composite reed valves comprised of leather with a layer of mylar over it. These are very similar to the composite leathers Ms. Bompezzo sells as an alternative to using the little metal spines (contrapelli) to stiffen the larger leathers.
For more discussion of the relative merits of mylar ventilli versus leather reed valves, see the article titled "Reed Valves - Plastic or Leather?"
To return to the table of contents, click here
FINDING AIR LEAKS
Most old accordions leak air somewhere, either through screw holes or cracks in the cabinet, or between the cabinet and the foundation plate, or through one of the bellows gaskets, or around one or more of the 41 treble valves and 24 bass valves, or through the switch linkage, or through the bellows themselves. Sometimes missing or broken reeds cause significant air leaks. Loose reed blocks can also waste a lot of air. Bad leathers can also increase air consumption. There are lots of possible sources of leaks, and a few small leaks can add up to a significant loss of air and accordion performance. Air leakage can make an accordion difficult to play.
Leaks come in two categories, external and internal. External leaks are those that allow the bellows to fall open or closed without any keys or buttons being pressed. Internal leaks are those that only show up while the accordion is being played. They allow air to find its way to an open note valve without first having to pass through the reed that is being played. It is important to identify whether your leaks are external or internal so you know where to look and what to look for.
External leaks are little holes and gaps where air passes into or out of the accordion without first having to pass through the reeds and valves. Fortunately, these are the easiest to find, as the escaping air can usually be heard and felt. The most common places to find external leaks are at the bellows gaskets, around loose or missing screws, shoulder strap brackets, or switch linkages, through damaged or misaligned treble and bass valves, and through loose or missing bellows corners.
Bellows gaskets are easy to change, and loose screws can easily be tightened. Small holes in the wood can be quickly sealed with reed wax. Leaking valves can be simple to repair, but in some cases can be time consuming, especially for leaking bass valves because they are so hard to access. A single leaking bellows corner can be easy to fix, but if more than a couple of corners are leaking, you probably need a new bellows.
Internal leaks only show themselves while a valve is open, that is, while the accordion is being played. The bellows can seem nice and tight while no keys are depressed, but the accordion consumes too much air when you play it. Sometimes these leaks can be heard as a hissing sound while a note is sounding, but their air streams can never be felt, as they are inside the accordion. The most common causes of internal leaks are bad or missing leathers, bent or broken reed tongues, loose reed plates, and loose or warped reed blocks. Internal leaks are often more time consuming to locate and repair.
To find out if your leak is internal or external, measure the amount of time it takes the bellows to close under its own weight from the full open position with all valves closed. Rest your accordion on its feet on a sturdy table. Unsnap the bellows straps, grip one end of the treble keyboard in each hand, press a few keys on each end, and lift the treble section to expand the bellows. Don't mind the discordant sound as air rushes into the bellows through the random combination of open valves. Keep lifting until the bellows is all the way open and the bass section lifts off the table. Shake it a bit to make sure the bellows is fully extended, then release all the keys so all valves are closed (but don’t drop the accordion). Note the time on a clock with a sweep second hand and let the bellows close by itself under the full weight of the treble section. Don't let go, but don't hold any weight, either. Use your hands to keep the bellows going down straight, but not to hold it open or force it closed. If the bellows takes less than 35 seconds to close, it has some external air leaks, as nearly all accordions do. If it takes less than 20 seconds to close, then you probably have an external leak large enough to easily locate and repair. If it takes between 20 and 35 seconds to collapse, the leaks will be much harder to find unless you use a sensitive microphone and amplifier to listen for them, as described in the article after this one titled "The Superstar Accordion Leak Detector".
To find the source of the leak without such a microphone, expand the bellows exactly as before, but this time as the bellows slowly closes under its own weight, pass your face around the exterior, feeling for drafts of air on your cheeks. Turn the accordion around and repeat the process until you have passed your face around the entire perimeter of both bellows gaskets. The skin on your face is very sensitive to tiny drafts, and most external leaks of any consequence can be found in this manner. To verify that you have found the exact source of the leak, put a small piece of masking tape over the suspected source and repeat the test. If the leak can no longer be felt, then you can be pretty sure it is under the tape.
If no leaks are found around the bellows, remove the treble grille and repeat the process to check for leaks around the treble valves. You can often isolate a single leaking valve by pressing it down lightly with your finger. If this stops the leak, you have found the source. You may be able to see that this valve does not rest flat on the foundation plate, or that it is not centered over its ports. If it appears to be centered, then the leak may be due to it being slightly tipped one way or another, or due to it being warped. You can use a narrow strip of paper as a feeler gauge to feel under both sides, both ends, and the center of the valve to be sure that each end, each side, and the center of the valve are all closing tightly against the foundation plate.
Another way to find treble valve leaks is to open the accordion, remove the treble reed blocks, make sure all the switch slides are open, and in a dark room pass a bright light around the reed block side of the foundation plate while you look for glowing felt pads on the valve side of the plate. Any glowing felt represents a probable air leak.
Pass the bright light around this side:

While looking for glowing felt on this side: (You're right, these are two different accordions, and you would put the missing key back in before performing the test, but you get the idea.)

Be aware, though, that on some accordions, mostly the very old ones from the 1930s and earlier, removing the reed blocks sometimes allows the foundation plate to flex, which can give false results on this test. That is, the valves that appear to be leaking under the bright light may not actually leak when the reed blocks are re-installed and the foundation plate is once again stiffened by their presence. Alternatively, the valves might pass the light test, but leak when the reed blocks are put back in, due to distortion of the foundation plate. However, on most newer accordions, this test works very well.
This same test can be performed on the bass valves, but the bass machine must first be removed, and in the vast majority of accordions, this requires disassembling it piece by piece, a very time consuming project.
An easier way to check bass valves for leaks (especially if the leather valve facings are light colored) is to remove the bass reed blocks and look at the valves from the inside. Gently press each valve open with a pencil eraser or other small blunt tool, and look for dust trails around the edges of the leather. The edges of the valves, where the nap of the leather has been flattened by contact with the foundation plate, should be clean. Dirty looking leather along these edges is an indication of a chronic air leak.

You may also find wood splinters, wax chips, or other foreign matter lodged under the valve, preventing it from sealing against the foundation plate, in which case you can probably cure the problem by removing the obstruction with a pair of tweezers. This one was an easy fix:

Sometimes, many individually imperceptible leaks in the bellows can add up to a significant external air leak. In this case, the only remedy is a new bellows. However, this is fairly unusual, so eliminate all the other possible leak sources before committing to a new bellows.
For the ultimate in external leak detection, see the article titled "The Superstar Accordion Leak Detector".
If your timed bellows collapse test reveals no significant external air leaks, but the accordion uses too much air when you play it, then you probably have an internal leak. To evaluate those, you will need to open the accordion.
When you have it open, check first for bad leathers and broken, loose, or missing reeds. There may be some problems that you can't see, that will show up only on a test bellows, but don't worry about that right now, just look for obvious problems. If lots of leathers are curled way back from their reed plates, replacing them may significantly decrease the accordion's air consumption. If one or more reeds are loose or have fallen out, re-waxing them may solve the problem. Can you spot the missing reeds and the bad leathers in this accordion?

Also check for loose reed blocks. If they move at all when you try to wiggle them, they are too loose, and simply tightening their mounting latch screw and/or installing a thin shim under the reed block restraint at the opposite end could cure the problem. In the photo below, the two screws in the top of each reed block are for securing the slide latch in locked position. The single screw immediately to the right of each reed block is for adjusting the downward pressure on the reed block. This screw should be snug enough to prevent the reed block from rocking or sliding around, but not so tight that pressure on the reed blocks distorts the foundation plate.

If the slide latch end of the reed block seems tight enough, but the other end seems loose, add paper or card stock shims as shown below. Add enough shims for a snug fit, but not enough to cause the slide latch end of the reed block to rise off the foundation plate. A drop of glue will hold your shims in place.

If you find no obvious problem, then diagnosing and repairing the internal air leak could take some time. There may be warped reed blocks allowing air to pass under their edges and directly to the open valve ports without first passing through the desired reeds. You can check for this by placing the reed block on a perfectly flat table and using a .003" metal feeler gauge to check for clearance between the table and the bottom of the reed block. If you find clearance at one corner or in the middle, the rest of the reed block will have to be sanded down to eliminate this clearance. Before sanding, however, you should move the reed block around on the table to make sure that irregularities in the table surface are not responsible for the clearance.
There might be reeds deformed by excessive pressure during tuning (you will be able to see a slight arch in the reed tongue), or there might be reeds that need to be properly voiced (you will notice that they respond slowly, and/or that they hiss before beginning to sound their notes).
Air might be leaking through cracks in the reed wax or around reed plates that have separated from the wax but have not yet fallen out. Even if the wax looks good, it might not seal to the wood separating two reed chambers, allowing air to leak from one reed chamber to the next. I have even found holes in the wood separations between adjacent reed chambers that allow air to leak from one to another. You can use your test bellows to check for these problems.
To return to the table of contents, click here
THE SUPERSTAR ACCORDION LEAK DETECTOR
One of the most time consuming aspects of accordion repair is locating air leaks. While large external leaks can be found by ear and/or by feeling the air stream on your face, finding them is often a two person job. Moreover, many external leaks including treble valve leaks are often difficult to feel, or even to hear, yet significantly impact performance, and down in the tone chamber they can be especially hard to locate. Bass valve leaks are hard to locate because you can’t get sufficiently close to them without first dismantling the bass machine. Then there is the problem of being certain that you have found and repaired all the other leaks in the accordion so you can confidently tell your customer that the remaining air loss is definitely in the bellows, where we often suspect, but cannot prove, that tiny leaks at each of the bellows corners, while individually undetectable, are adding up to to a big loss of air.All these problems are instantly solved by using a miniature electret condenser microphone and amplifier with headphone. This device makes finding leaks a one person job. More importantly, it makes even the tiniest leak literally roar into the headphones.
I use a 4mm diameter unidirectional electret condenser microphone element with a compact pre-amp and amplifier circuit designed for me by Alan Polivka to run on a 9-volt battery. I squeezed it all, including circuit board, battery, microphone jack, volume control, and on/off switch, into a 2 1/8” x 3 1/4” x 1 1/4” (54 mm x 83 mm x 32 mm) plastic box that clips onto my pocket. A cheap stereo headphone completes the assembly.
Mounting the tiny and fragile microphone element into one end of a 6-inch (15 cm) length of 3/16” (5 mm) o.d. pvc tubing protects it from damage, yet still allows putting it down into some very tight places. Just use a 4 mm drill bit to enlarge about ¼ inch (6 mm) of one end of the tube to snugly fit the 4 mm microphone element. A squirt of hot glue from a glue gun into the opposite end of the pvc tube holds the microphone wires firmly in place and eliminates any chance of pulling them off the microphone element during normal use. The elasticity of this pvc wand acoustically isolates the microphone from your hand, thereby minimizing the noise caused by gripping the wand with your fingers or by rubbing it against parts of the accordion, thus eliminating the main annoyance of using a stethoscope, which tends to roar anytime you move it.
This little microphone reaches into places a medical stethoscope won’t go, and is far more sensitive to air flow. It fits down between treble valve rods to listen right alongside each treble valve, including those in the tone chamber. It reaches down through the pistons of the bass machine to listen alongside individual bass valves, bass register slide pivots, and other foundation plate penetrations. Unlike lengthening a stethoscope hose or adding slimmer tubular extensions to reach int tight places, lengthening the microphone cord or wand does not decrease its sensitivity. It is great for listening around cabinetry joints and foundation plate edges in behind the treble valve rods and around the bass cabinet, as well as around the bellows gaskets and external screws.

Headphone, amplifier, and microphone
 Electrical design by Alan Polivka, email AcrdionMan@msn.com or find him on Facebook under Alan Polivka.
Hot glue from glue gun
To return to the table of contents, click here
It is always annoying to find a stripped out wood screw. It is even more annoying if it is in a place that causes an air leak. Sometimes you can get away with using the next larger diameter screw, but sometimes that is not practical, in which case you must fill the hole and start over. This simple procedure also comes in handy whenever you want to fill an old hole after moving some bracket, strap, or snap to a new location.
If the hole is small enough, you can use a round or square wooden toothpick (the flat ones do not work well) as a plug. If the hole is too large for a toothpick, use a small softwood dowel, available at the building supply store for under a dollar. Whatever your chosen plug, make it longer than the depth of the hole you are filling, because you will want to trim it off flush later. If using a toothpick, trim off part of the point as required for a slightly snug fit in the hole, then shave the rest of it down to that same diameter. If using a dowel, either shave it down to fit the hole or ream the hole larger for a slightly snug fit around the dowel. Work from the outside, but check on the inside to be sure the plug or the glue you will use will not interfere with anything on that side.
Use a wooden toothpick to coat the inside of the hole and the outside of the plug with Elmer's wood glue. Push the plug into the hole until it bottoms out or, if the hole goes all the way through, until it is flush with the wood on the other side. Let the glue dry for several hours. When the glue has dried, trim the plug flush with the surface with a single edge razor.
If you plan to install a new screw in the hole, use a tiny drill bit (no more than 2/3 the diameter of the screw) to drill a pilot hole. If your new screw is smaller than the smallest drill bit you can get, then try using the point of an awl, or perhaps even a straight pin or sewing needle to make the pilot hole. Getting the new screw started in a pilot hole will ensure that it enters the wood precisely where you want it, and also helps prevent the new screw from stripping out as you drive it in.
If you don't plan to install a new screw in the hole, and if you wish to repair the celluloid finish at the hole's location, then snip the plug flush with the surface before the glue dries and use another piece of dowel to force the plug a bit farther into the hole so it ends up very slightly below the surrounding surface. Then use black fingernail polish (or some other matching color if your accordion is not black) very sparingly just on top of the plug, being careful not to get it on the surrounding celluloid. Don't try to fill the hole with fingernail polish all at once. It is better to build it up in thin layers after each preceding layer dries. When you finally have the fingernail polish flush with the surface, stop. If you have kept the fingernail polish confined to the diameter of the hole, your repair will be small and inconspicuous and will not need further finishing.
To return to the table of contents, click here
If you have a leak at one of your bellows gaskets, replace the gasket.
Pull the bellows pins, split the accordion, and determine whether the gasket is located on the bellows or on the cabinet. The old gasket is likely to be leather, mounted in a 3/16 to 1/4 inch wide shallow channel on the bellows frame, but is sometimes mounted on the treble or bass cabinet. With time, the leather shrinks, the cabinet warps, the bellows frame warps, or the bellows pins loosen up. Whatever the cause, the leather is no longer able to make a good seal. Peel it off and use a narrow flat blade screwdriver or similar scraping tool to remove the residue and the old glue. Take care not to damage the plastic trim bead that usually forms the outer wall of the shallow channel.

Replacement gaskets are adhesive backed foam rubber. This material is a bit thicker and more resilient than the original leather, and will seal better. It is available in long rolls in two different widths (3/16" and 1/4") from FRM Enterprises in Montreal for $12 or $13 per roll. A roll is enough for several accordions. Just get the roll width that matches your old gasket, cut off what you need, peel off a few inches of one end of the paper backing protecting the adhesive, and press the gasket into place, taking care to keep it properly aligned and lying flat in the channel, peeling off the backing as you go. Try to make the gasket all one piece in order to minimize the chances of a leak at one of the end joints.


I begin and end with a steep bevel cut across the gasket to allow a long side by side lap joint where the two ends join. This eliminates the need to cut the new gasket quite as precisely to the correct length. However, simply butting the square cut ends snugly together will suffice, if you get the length cut exactly right. As you round the corners on your bellows frame, stretch it a bit to fit the curve and press it firmly into place a fraction of an inch at a time to ensure a good fit and stable anchorage around the corner. If the gasket surface is double or triple wide along the front of the bass section by the bass switches, simply cut and fit additional strips of the gasket snugly against one another as required to fill the space to the same extent that it was filled by the original gasket.

You will occasionally find that the new gasket material is not thick enough to seal the joint. In that case, try applying a second gasket over the first one. If you can get the bellows pins in without excessive force, this double gasket will probably solve the problem. However, if the double gasket turns out to be too thick, that is, if there is danger that forcing the bellows pins into place will enlarge the holes or perhaps split the bellows frame, then peel it all off and start over, looking for a different solution.
Check the mating surfaces of the bellows frame and accordion cabinet for warpage with a straight edge. If identifiable high spots are found, sanding them down may provide sufficient room for the double gasket. Also look for screws, brackets, internal microphones, wires, etc. that might be preventing the bellows frame from uniformly and snugly contacting the mating surface in the cabinet. In extreme cases you might lay in a second layer of gasket just where the single thickness gasket continues to leak, thus avoiding excessive pressure on the bellows pins in the areas where a single gasket is thick enough.
If you have the thickness just right, when you put the accordion back together you should have to slightly compress the new gasket by pressing down lightly on the treble section in order to allow the bellows pins to be pushed into place with moderate pressure. If they go in too tightly, they might damage the bellows frame. If they go in too loosely, the gasket may still leak. You will be rewarded for getting it right because few things are better than a nice airtight accordion.
To return to the table of contents, click here
You will probably eventually encounter an accordion with a cracked cabinet, perhaps from being dropped. The most common crack is under the bass cover around the bass cover mounting screws, where the rather fragile wood structure sometimes cracks along a line between the two screws at one end of the cover, so the screws won’t hold. Another fairly common crack is in the wood supporting the lower end of the bass machine, or between the slots in the wooden bass piston guide at the bottom of the pistons. The worst kind of crack is at the corners of the treble cabinet where it joins the bellows, because not only does air leak through the crack, but the resulting loose fit around the bellows frame often causes the bellows gasket to leak, as well.
The good news is that nearly all these cracks are repairable, but I have seen some pretty shoddy failed attempts to glue and tape these things together, so I think it might be useful to review the correct way to repair cracked or broken wood.
The first rule is that the crack must be glued and clamped. Just pouring glue into the crack will not suffice, as it will create a very weak joint certain to crack open again, probably immediately. For a strong glue joint, the glue must be in a very thin coat over a fairly large area of contact between the two sides of the crack, and allowed to cure overnight under clamping pressure, with the two sides of the crack pressed firmly and tightly together by the clamps.
The second rule is that you must have your clamps ready ahead of time so you can set them immediately after you glue the joint. After you have brushed on the glue is not the time to go searching for clamps, nor is it the time to discover that the clamps you have selected will not fit or will not hold, or will not stay in place on a curved surface. All the details of the clamping must be worked out in advance, and the clamps actually installed and tightened before you glue anything, just to make sure it will all work as planned. Once you have proven that your clamping arrangement works, remove the clamps, spread Elmer's wood glue in the joint, and reapply the clamps.
Sometimes even this will not hold, especially if the wood is thin and the pressure forcing the crack open is great. Such is the case with cracks at the corner of the treble cabinet where it joins the bellows. The plywood wrap around these corners of the treble cabinet is very thin to allow the bellows frame to fit snugly down inside the cabinet, so the faces on either side of the crack are very small, not affording enough contact area to provide a structurally strong joint if simply glued and clamped.
Whenever a simple glued joint will not suffice, you will have to fabricate some kind of doubler across the joint. If it is a wooden doubler or a corner gusset, it, too must be glued and clamped in place after the crack itself is clamped securely closed by its own set of clamps. If there is not room for a wooden doubler or gusset of sufficient thickness and strength (such as at the corners of the treble cabinet facing the bellows), you can fabricate an aluminum corner bracket and glue and screw it in place. In this case, the screws are merely clamps that are left permanently in place. Naturally, the bellows frame will have to be mortised to fit around the aluminum corner bracket, or the bellows frame will not fit back into the treble cabinet.
No two cracks are the same, so it is impossible to write detailed instructions that will apply in every case, but walking you through a repair I recently made will help illustrate the basic procedure, and may provide some ideas for repairing the next crack you encounter.
Clamping a rounded corner may seem daunting at first, because the usual spring clamps and screw clamps will not fit. But if you are creative, you will figure out some way to clamp it. I used a one inch wide nylon cargo strap around the cabinet, tightened by the little hand winch that comes with the strap. I modified the strap to eliminate the steel hooks, which I feared would mar the accordion finish. I ground off the rivet and removed and discarded the short strap with its hook. Then I removed the hook from the long strap and anchored one end of that strap to the winch with a bolt and nut to replace the rivet I had ground off. I wound the other end of the strap around the spool of the winch and used the winch to tighten the strap around the treble cabinet until the cracked corners closed. Naturally, I had to first remove the bellows strap snaps and shoulder strap brackets to allow the cargo strap to fit snugly against the celluloid finish. I used a soft rag as a pad to protect the celluloid finish from being marred by the metal winch.
I found a short piece of scrap aluminum tubing with the same outside radius as the inside radius of the treble cabinet corners. I cut the short length of tubing into quarters, circumference-wise, so each of my corner brackets started out as a 90 degree curve. I trimmed these down to maybe 70 or 80 degree curves on my belt sander, as I wanted them just wide enough to allow getting my screws into solid wood on either side of the crack. I used a center-punch to locate four holes in each of them, then used my drill press to drill those holes to match the outside diameter of the small brass wood screws I had on hand, which were short enough not to go all the way through the wood. I then used a countersink mounted in the drill press to countersink the heads of the flathead screws flush with the aluminum, so they would not interfere with the bellows frame.
With the cargo strap tightened to completely close the cracks, I held the new brackets in place on the accordion with small spring clamps while I used the brackets as templates to drill tiny pilot holes in the wood. After drilling the first pilot hole for each bracket, I put a screw in it to hold the bracket firmly in place while I drilled the rest of them. I wrapped masking tape around my pilot hole drill bit to use as a depth gauge to avoid drilling all the way through to the outside finish, and I drilled by hand, holding and turning the drill chuck with my fingers.
Using just two screws to hold each corner bracket in place, I set the bellows in place, marked the bellows frame at the edges of both corner brackets, and used a box cutter to hand carve mortises in the bellows frame corners to accommodate the thickness of the new corner brackets. I removed the corner brackets from the cabinet to use as templates to carve the bellows frame corner to exactly the right curvature and depth for a snug fit.
Note that all this was in preparation. Nothing had been glued yet. I released the cargo strap, cut small pieces of waxed paper to fit between the strap and the outside face of the accordion at the cracks, to prevent any glue that might squeeze out of the crack from gluing the strap to the accordion. Only then did I put glue into both cracks, using a narrow piece of .002” metal feeler gauge to work the glue thoroughly down into the bottoms of the cracks. Once I was sure that the entire inside faces of the cracks were thoroughly coated, I put the waxed paper in place and tightened the cargo strap until the cracks were once again completely closed, forcing most of the glue out of the crack.
With the cargo strap still firmly tight, I then brushed glue onto the aluminum corner brackets and onto the wood behind them, and installed the screws to clamp them in place. I let the whole thing dry undisturbed overnight.
In the morning I released the cargo strap and reinstalled the reed blocks, shoulder strap brackets, bellows strap snaps, and bellows. What the previous day had been a worthless, unplayable, cracked and leaky mess, was now a perfectly playable accordion. I scraped just enough glue out of the cracks to make room for a few thin layers of black nail polish to color the repair to match the accordion finish. What had been 1/8” wide gaping cracks were now almost invisible. It was a very satisfying repair.
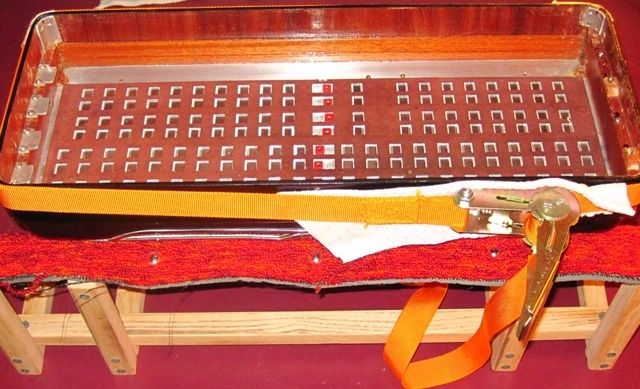


To return to the table of contents, click here
One of the easiest and most economical ways to enhance the look and feel of your accordion is to install a back pad, which helps protect the bellows from your clothing and vise-versa. Back pads are normally held on by four snaps. The female halves of the snaps are usually pre-mounted in the back pad, and the male halves of the snaps and the screws for attaching them to the back of the treble keyboard are usually supplied loose with the pad. Make sure the supplied screws are not longer than necessary to penetrate the snap and the wood, as you do not want the screw point interfering with the action of any of the treble keys on the other side.
Set the accordion on its feet and position the pad where you want it. Make sure you have the right size pad, as they come in various sizes. The pad should not be so large that it sticks out past either end of the accordion, and it should probably be at least large enough to reach within one inch of either end. I like mine to reach just about to the beginning of the curve on the bellows corners. In the other direction, I like my back pads to extend about an inch past the bass side of the bellows, but many are installed flush with the bass side of the bellows; it’s your choice. You can slide it up or down to suit yourself. Although they are typically installed within an inch or so of the edge of the keyboard, this is not critical, as this part of the accordion does not move much relative to your clothing.
Make sure the pad is square with the accordion, then place a one inch square of doubled or tripled masking tape approximately centered under each of the snaps. You will use these to mark the exact locations for the screw holes. You are doubling it to allow you to make a better impression of the snap in the thicker, more compressible multiple thickness tape.
Start by marking just one screw location on the tape. Choose a drill bit no larger than 2/3 the diameter of your screw, and drill the pilot hole very carefully so as not to punch through the thin wood and damage one of the keys on the other side. I drill by hand, using a drill bit and chuck only (no drill motor). The wood is soft and not very thick, so several twists of the drill under moderate pressure should be enough to drill your pilot hole through the tape and the wood. Twist one of your screws partway into the hole to begin cutting the threads, then back it out, remove the tape, put the male snap in place and install the screw. Snug is enough. Don’t over-tighten it, or you may strip the threads out of the thin wood.
Snap the back pad onto that snap, position it square with the accordion, and press one of the other snaps hard against its masking tape pad to make a circular impression in the tape. Mark the center of this circular impression with a pen or pencil, and drill your pilot hole through the mark. Tap the threads and install the snap just as you did with the first one. Repeat with each of the two remaining snaps.

To return to the table of contents, click here
